


|
| |
| Welcome to myHanse.com the forum for Hanse Yachts owners throughout the world. | |
Failed Engine Mounts |
Post Reply 
|
Page <12345> |
| Author | |
Captain Cook 
Admiral 

Joined: 23 May 2006 Location: Denmark Status: Offline Points: 1245 |
 Post Options Post Options
") Thanks(0) Thanks(0)
 Quote Reply Quote Reply
 Posted: 11 August 2019 at 18:38 Posted: 11 August 2019 at 18:38 |
|
Hi Gordon (Angelina) Welcome to the forum, but beware of old-timers with no sense of humor  . .As reply to your questions on PM: 1) No I did not loosen the aft mount - but feel free to do so, it can do no harm. (Difficult to access though). 2) The engine only needs to be lifted a few centimeters. Just angle the new mount a little when mounting it. In my photo you can see that I marked the position of the old mount with blue speed-marker. 3) The oil pan is made of iron, so I had no qualms to lift it with a broad piece of plywood. I was 100 Nm from home, and needed to use the tools available to me. 4) I changed the diaphragm because I planned an ocean crossing. I did not know, what stress it had suffered, when the engine was dancing rhumba in the engine room. In an older post of mine there is a photo of the old diaphragm, it feels and looks just like the new one. I would not be nervous to mount the old one again. The mechanic also checked the aft engine mount, and said that it was as good as new. Good luck with the repair! Kjeld Update march 2024: 12 years have passed, and my repair and "upgrade" with a few extra nuts and blue Loctite is still working. I recall, that the reason I did not lift the engine in the lifting ring, was that this ring is placed over the engines center of gravity, so the engine will stay horizontal when lifted there. I wanted to raise only the front of the engine, so that brought forward the pieces of plywood. First I stabilized the engine with the broad piece, and then I used the slimmer piece underneath this (as a lever) to lift the engine when needed.
Edited by Captain Cook - 24 March 2024 at 11:45 |
|
|
Freya H400 #27 (2006),2-cabin, 40HP 3JH4E, 3-blade Flexofold, Aries LiftUp Windvane, Exturn 300, Jefa DD1,Simrad NX40,Icom M603(VHF)+M802(SSB)
|
|
 |
|
|
Captain Cook
Admiral
Joined: 23 May 2006 Location: Denmark Status: Offline Points: 1245 |
Post Options
Thanks(0)
Quote Reply
Posted: 11 August 2019 at 21:29 |
|
In this forum I only remember to have seen the breaking of the engine-mounts bolts mentioned by Landlocked, myself, and now Angelina. Out there there may be other Hanse owners with one or two broken bolts. If you study the pictures of my bolts, it seems that one is corroded on the breaking surface, meaning that one bolt was broken some time before the other also broke. In my case, I normally check my engine room at intervals when sailing, more often when the weather is bad. In 2012 I were sailing by engine and the main in 3rd reef between Denmark and Germany in some 14-16 m/s or 30-34 knots, and when I lifted the stairs, I noticed the engine periodically lifting 5-10 cm in one side, when we were thrown around in the heavy waves. I throttled down, and at lowest safe speed I used a pair of endless clamping straps to secure the engine to the mounts. Then I found the nearest harbour. The lesson to learn is, that one mount was broken for some time, and as you can see in the photos, the engine was fallen down to a position, where it rested quite nicely if you only sailed in calm weather. I will recommend, that you check this next time you visit your boat. To check if only one mount is broken, you have to use a lever to lift the engine in one side, and then the other. As Landlocked is writing, this failure is known to other brands than Hanse. With the knowledge I have obtained about this, I will recommend, that you buy a couple of nuts, and a pint of Loctite, and change your engine mounts to a look-a-like of what Landlocked and I have made. Back in 2012 I found a recommendation from Yanmar to secure the engine to the mounts by way of mounting a steel-wire with clamps as seen in my photo on page 1 of this thread. This should be a precaution if the mount broke when sailing in heavy weather. This way the engine would be restricted from moving very far from the mount. I will try to search the net for the recommendation. :Kjeld
Edited by Captain Cook - 14 August 2019 at 12:09 |
|
|
Freya H400 #27 (2006),2-cabin, 40HP 3JH4E, 3-blade Flexofold, Aries LiftUp Windvane, Exturn 300, Jefa DD1,Simrad NX40,Icom M603(VHF)+M802(SSB)
|
|
|
|
|
landlocked
Rear Admiral 
Joined: 12 April 2005 Location: Canada Status: Offline Points: 568 |
Post Options
Thanks(0)
Quote Reply
Posted: 12 August 2019 at 01:17 |
|
I agree with Captain Cook that the installation of these mounts should be modified such that the threaded rod is not being used as a structural member. It should only be used to clamp the engine bracket onto another structural member (nut, spacer, washer, etc).
When the threaded stud is used as a structural member in this way it is subjected to a bending stress which is concentrated on the vertex of the first exposed inside thread (below the engine bracket). A crack develops in the thread and migrates through the stud until it fails. How long this takes probably depends on a lot of uncontrolled factors, like the condition of the die that cut the thread, or the microscopic structure at that particular part of that thread. Just google threaded rod as structural member and you will find documents like this one http://www.aefac.org.au/documents/AEFAC-Pub01-threaded-bar.pdf Here is a quote from the section titled Important Conditions: Threaded bar in its own right is not an ideal structural member. The threads act as notches and when subject to bending, material failure could occur at a lower load than that for a smooth bar due to stress concentrations associated with thread roots. The same reason makes threaded bars not suitable for dynamic load applications where they could be subject to premature fatigue failure. Furthermore, when the strength of the bar increases, its susceptibility to brittle fracture and fatigue failure also increases. I think this can easily be solved but unfortunately Yanmar seems to deny the problem. They told me their engine mounts dont break and I must have crashed my saildrive into something with enough force to shear off both of the shock-mounted bolts. I told them there was no collision but they prefer to call me a liar than to review their design. To me, this is pure negligence because it is a clearly deficient design with a history of failures, a safety risk, and an easy remedy, but they are ignoring it.
Edited by landlocked - 12 August 2019 at 02:13 |
|
|
"Kerkyra" 400e #042
|
|
|
|
|
Mark_J1
Rear Admiral

Joined: 12 March 2013 Location: Dover&Medway UK Status: Offline Points: 690 |
Post Options
Thanks(1)
Quote Reply
Posted: 14 August 2019 at 00:50 |
|
This topic surfaces repeatedly. Worth emphasising its a common Yanmar issue not a Hanse problem. See http://www.myhanse.com/engine-mounts_topic6573_page1.html for some additional thoughts and analysis.
One thing Id add to my comments in the earlier thread. Subsequent to the engine mounts failure and change we also did a saildrive inner diaphragm change. It was perfect after 13 years. I would not be concerned for the diaphragm given the small lift necessary to swap the front engine mounts.
|
|
|
Hanse 400e "Grey Goose" Hull #31
|
|
|
|
|
Angelina
Lieutenant 
Joined: 10 August 2019 Location: Far Status: Offline Points: 23 |
Post Options
Thanks(1)
Quote Reply
Posted: 14 August 2019 at 08:29 |
|
Hello All!
Thanks very much for the quick replies on an old thread. I have now now replaced my broken forward mounts with original yanmar spare parts. Same as the old ones. As the posters above I have bridged the gap on the threaded bolt with the large nut supplied with the spare part. Now no more freestanding threaded bolt. The height of the installation has stayed very much the same. Yanmar drawings specify 100 - 110 mm between Bottom of the vibration mount and bottom of the engine bracket. I now have 105 mm. I did this on a swing mooring in calm seas but 35 degrees and very high humidity. Both aft cabin doors dismantled, stairway and lower front engine compartment panel behind stairs removed. The engine was liftet by a helping hand with a square wood of about 90cm as lever. This was wedged between the Grp engine support in front of the engine and the edge of the oil pan. This is about 1.5cm wide and the wood eventually pushed up on the bolts behind this edge holding the oil pan in place. I was able to lift the engine just high enough to slide out the old mounts and in the new vibration mounts with a little bit of jiggling. Parts are of exactly the same messurement, fitted well. Thinking and planning was the most difficult. Just a screwdriver, 12, 13, 17 and 24mm spanner needed. All done easily in a day. Just a description of 'My Way'. Not intended as an instruction. Thanks and be safe out there. G. Sorry could not upload pictures due size of file. Pm if needed. Edited by Angelina - 14 August 2019 at 08:46 |
|
|
|
|
Captain Cook
Admiral
Joined: 23 May 2006 Location: Denmark Status: Offline Points: 1245 |
Post Options
Thanks(0)
Quote Reply
Posted: 16 August 2019 at 22:17 |
|
On Marco's wesailhanse page you can find a manual for Yanmar SD 20-50 Try to read page 49: Every 2000 motor-hours, replace engine mounts, and cone clutch! Or at page 48: Replace rubber diaphragm seal ring every 2 years! Every year inspect and/or replace flexible engine mounts. Clearance between the metal parts of the mount bonded to the rubber minimum 1 mm. This and much more is found at wesailhanse.se Edited by Captain Cook - 09 March 2024 at 22:46 |
|
|
Freya H400 #27 (2006),2-cabin, 40HP 3JH4E, 3-blade Flexofold, Aries LiftUp Windvane, Exturn 300, Jefa DD1,Simrad NX40,Icom M603(VHF)+M802(SSB)
|
|
|
|
|
Angelina
Lieutenant
Joined: 10 August 2019 Location: Far Status: Offline Points: 23 |
Post Options
Thanks(0)
Quote Reply
Posted: 27 August 2019 at 12:59 |
|
Hi All,
as reported I recently changed the old vibration mounts. I bridged the gap on the threaded bolts with the larger nut of the old mounts. In hindsight I would now probably rather space the whole gap with a piece of stainless steel pipe instead of a nut under the engine bracket. Anyway, a new question: Running the engine hard for 2 x 2 hrs trips I noticed the engine gets very hot. Top of the engine is fine, Water exchanger etc. can be touched by hand. However: lower part gets very hot. Actually the engine brackets get very hot and actually transmit this heat into the vibration mounts! About as hot as the oil filter gets. I think the cooling system is fine. Full water flow, exhaust water warm but not too hot. Heat exchanger dismantled and cleaned earlier this year. Yes an engine gets hot. And mine runs in 27 degree seawater. But the engine mounts too hot to touch? By the way, I have the original blower working. Pushes out warm air in aft cockpit. However, sounds stupid, but I am unable without dismantling the hose to work out if it blows air out or sucks in?? Anyone get the same hot mounts? Thanks G. Edited by Angelina - 27 August 2019 at 13:02 |
|
|
|
|
Sportswagoneer
Lieutenant Commander 
Joined: 17 June 2018 Location: Norway Status: Offline Points: 77 |
Post Options
Thanks(1)
Quote Reply
Posted: 08 March 2024 at 19:22 |
|
I did a little research into this and found the blog-post from Ellebogen below.
It appears that in saildrive boats, the forward thrust from the propeller is transferred to the hull via the engine mounts. This means that they have to absorb highly fluctuating loads both in the vertical and horizontal plane. (Gravity and thrust.) (Some prop-shaft boats have a thrust bearing that takes up the thrust load - but thatll typically be higher power engines.) Ellebogen specifies a maximum of 7mm spacing between the nuts to avoid damage to the bolts from fatigue.
|
|
|
2010 Hanse 400 #700 Neste Sommer
|
|
|
|
|
Captain Cook
Admiral
Joined: 23 May 2006 Location: Denmark Status: Offline Points: 1245 |
Post Options
Thanks(0)
Quote Reply
Posted: 08 March 2024 at 22:08 |
|
The link above may be interesting for quite a few Hanse owners, who can see more than 7 mm of thread in the engine mounts. Maybe now is the time to buy a couple of nuts and stiffen the bolt a bit? In a worst case scenario, two broken engine mounts may be dangerous when sailing in rough weather. When my mounts broke apart, I had not yet mounted the steel wire in the photo, so the engine danced a kind of rhumba in the engine room until I got it secured. ...................Just a friendly advice. :Kjeld 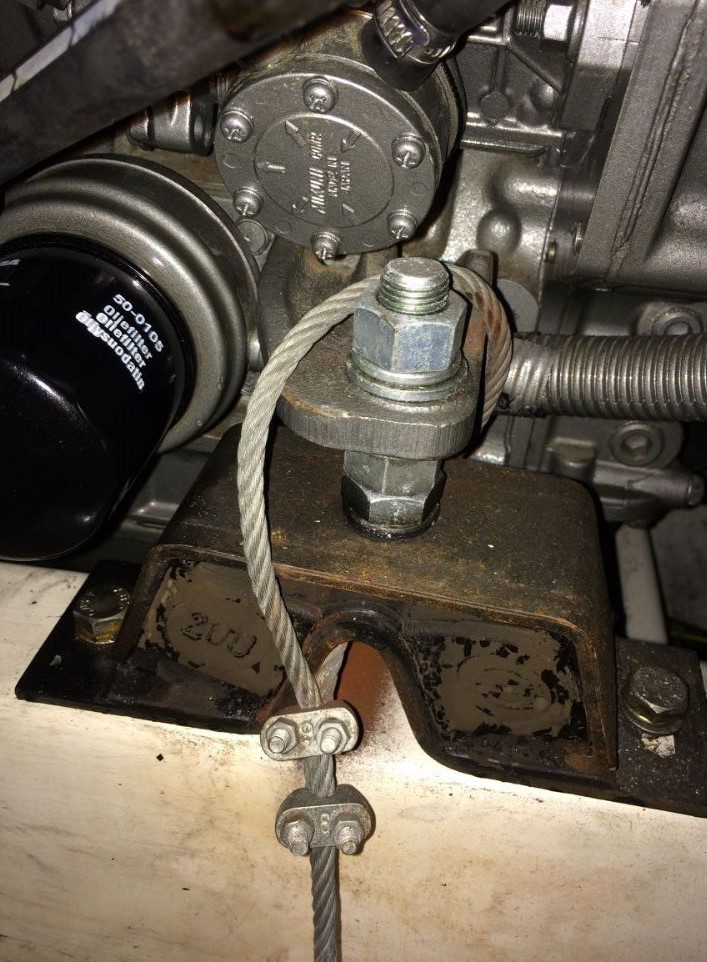 Edited by Captain Cook - 09 March 2024 at 09:37 |
|
|
Freya H400 #27 (2006),2-cabin, 40HP 3JH4E, 3-blade Flexofold, Aries LiftUp Windvane, Exturn 300, Jefa DD1,Simrad NX40,Icom M603(VHF)+M802(SSB)
|
|
|
|
|
Mark_J1
Rear Admiral
Joined: 12 March 2013 Location: Dover&Medway UK Status: Offline Points: 690 |
Post Options
Thanks(0)
Quote Reply
Posted: 09 March 2024 at 09:39 |
|
Re adding restraint links. I upgraded to R&D Marine mounts with built in rollover protection that dont need the restraint cables but if you dont have that feature in the mounts they are a great idea. Our front mounts failed with almost no indication in gentle seas but could have been a much greater problem. The Ellebogen mounts are another good choice. Both are better/cheaper than the Yanmar equivalent.
Having corresponded with Ellebogen on the failure mode I should to be fair, point out the issue with the Yanmar mounts cyclic failure is at least partly due to poor install practice by Hanse. They had just set the engine too high on the studs. Yanmar even make it clear what the max height is in the install manual. So we had a failure at <400hrs. 600hrs later the R&D Marine mounts are still good (& give less vibration). Mark
|
|
|
Hanse 400e "Grey Goose" Hull #31
|
|
|
|
|
Post Reply
|
Page <12345> |
| Tweet |
| Forum Jump | Forum Permissions You cannot post new topics in this forum You cannot reply to topics in this forum You cannot delete your posts in this forum You cannot edit your posts in this forum You cannot create polls in this forum You cannot vote in polls in this forum |
|
Links : www.hanseyachts.co.uk www.hanseyachts.com www.fjordboats.co.uk www.dehler.co.uk www.varianta.co.uk |


 Topic Options