Improving the fridge
Printed From: myHanse.com
Category: Hints & Tips
Forum Name: 400
Forum Description: 400 Hints, Tips and News
URL: https://www.myhanse.com/forum_posts.asp?TID=11141
Printed Date: 27 March 2026 at 03:41
Software Version: Web Wiz Forums 12.06 - https://www.webwizforums.com
Topic: Improving the fridge
Posted By: jeb
Subject: Improving the fridge
Date Posted: 28 November 2018 at 16:08
|
I have planning to improve the fridge on my Hanse
400 for several years and after the extremely hot Swedish summer I finally
started. My plan was to add extra insulation and
buying a water-cooled Isotherm unit. Im now in the mid of the project. I made
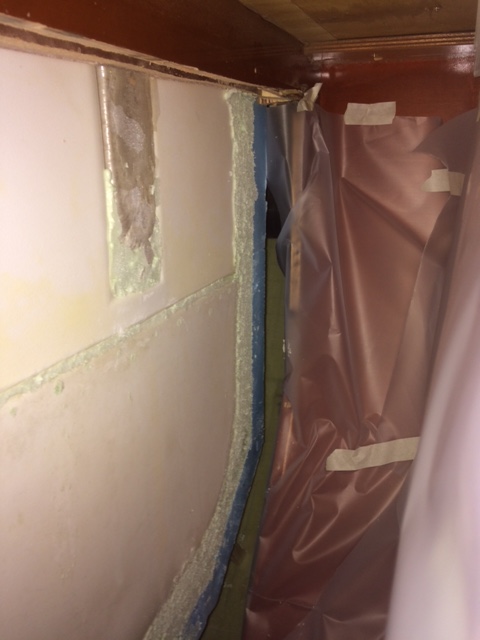
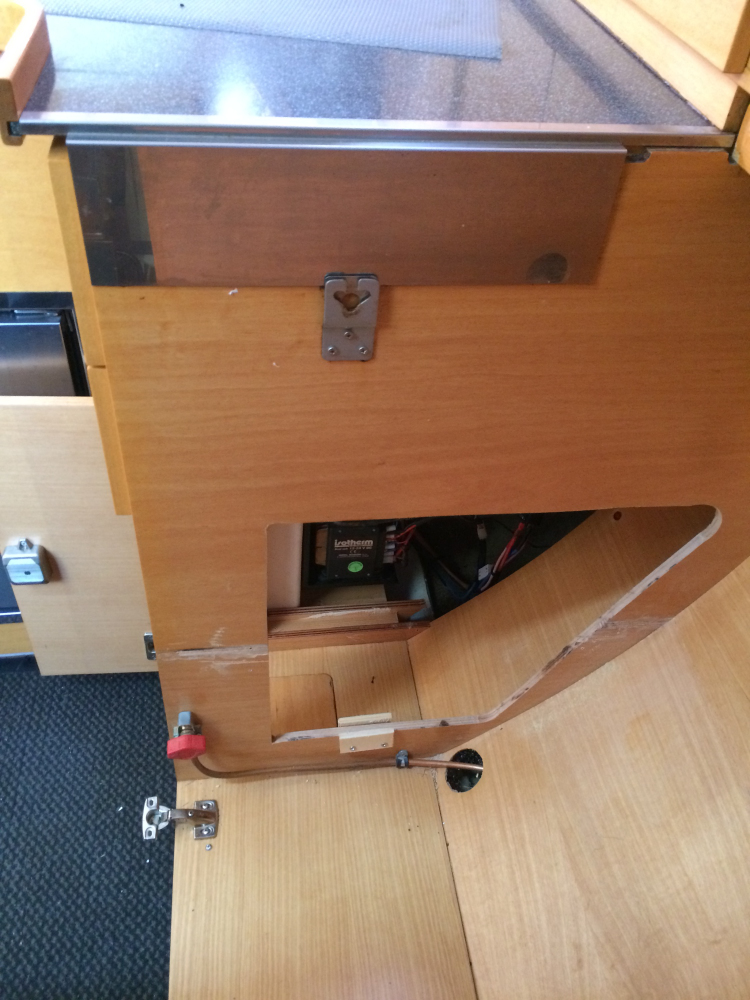
openings in the cupboard aft of the fridge as well as from the saloon side. Im
now able to access 3 sides and are adding 40-50mm of blue Styrofoam. With the fridge exposed I was also able to
detect voids in the original insulation, about 20 mm from the joint and down
was not filled so I fixed that with expanding foam. I was also able to glue 50
mm of insulation below the fridge. If needed I will add 20 mm of insulation on
the inside the fridges left side where there is no access from the outside. When ready,
there will be 4 major improvements. ·
Fixed
the original insulation ·
Adding
40-50mm insulation giving a total of 100-110mm ·
Removing
the heat source (compressor) behind/below the bottle area · Water cooling
Big hole in the locker between stowe and fridge, insulation behind teh fridge visible.
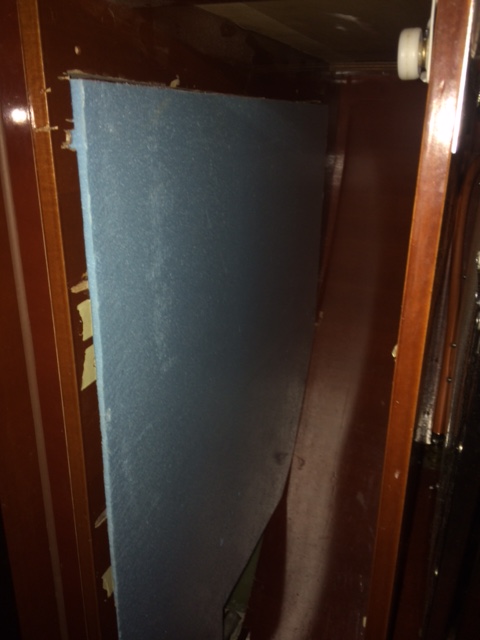
Insulation test fitted, will be trimmed to 45mm and covered with white pvc. All scratches will be hided by the pvc and the shelfs/drawers.
------------- Jesper Hanse 400e |

Replies:
Posted By: toholthe
Date Posted: 28 November 2018 at 22:11
|
I am adding a small fan in the fridge to get better air flow inside. In my Hanse 400 from 2007 the evaporator is rally cold, but inside the door is not cold at all. Plan is to connect fan to lamp in fridge. I will use this fan: https://www.ebay.com/itm/DC-12V-50mm-Blower-Cooling-Fan-Hotend-Extruder-Turbine-Fan-for-3D-Printer-UK-LLD/173573926072?hash=item2869cfecb8:g:SkgAAOSwQIFbuBJJ Plan is to mount it in the roof of the fridge over the door blowing towards the evaporator. |
Posted By: jeb
Date Posted: 29 November 2018 at 08:37
|
Thanks for the tip, My main concern has been the current consumption due
to the fact that the compressor is running almost constant. I have already installed
the Smart Energy Control from Isotherm and that unit measures the temperature
in the box and not at the evaporator as the original thermostat, so temperature
close to the door is not a problem. But
I will consider adding a fan and try to wire it so it turns off when the box is
opened (to avoid blowing in hot air). ------------- Jesper Hanse 400e |
Posted By: Mary400e
Date Posted: 29 November 2018 at 10:38
|
Hi Jesper I have a plan for the winter to do improvement regarding the fridge. A couple years ago did I made a lot of large holes in the wooden plate covering the compressor, and have removed the small cupboard door to improve the ventilation. This have improved a lot, but more is needed. Can you provide more details about the component used. Thanks. BR Jesper B (from DK) Hanse 400e (Tiramisu) from 2007
|
Posted By: Borjebus
Date Posted: 29 November 2018 at 14:44
|
Hi Jeb, Where do you plan to locate the compressor when you move it? ------------- BÄSK, Hanse 370e #82 from 2006, Yanmar 3JH4E/SD50, 3-blade Flexofold, RMC(Lewmar) 185 Bowthruster, Vulcan 9, Simrad+B&G instruments |
Posted By: jeb
Date Posted: 29 November 2018 at 21:22
|
It's not that sensitive where to locate a water cooled unit. I will use the isotherm sp2351. The evaporator is the same size as the old one. I will mount the compressor under the removable part of the u-sofa in front of the sink. I will add more pictures when I have made more progress. @jesper B, that's my name as well! I used same strategy as you, removed the wooden cover and kept the door open but that was not sufficient. As insulation I'm using blue EPS. Behind the fridge I had to make 4 pieces and glue them together. Below under the plywood supporting the box I had to use 3 pieces to be able to slide them in. I have removed the removable aft part of the sofa, was only fixed with 4 screws. I was cutting away as much as possible of the plywood without removing the big part of the sofa but I did not get access to the complete front of the fridge so I had to make a puzzle of several pieces that was glued together while slided in. The most complicated part was to gain acces to the front from inside the cupboard. It was actually 2 pieces of plywood with some wooden pieces between, total thickness of about 50 mm (48 to be exact). Before doing the cutting I had to remove the shelfs. All small gaps between EPS parts and other voids have beed filled with foam for outdoor use. ------------- Jesper Hanse 400e |
Posted By: jeb
Date Posted: 19 February 2019 at 18:02
|
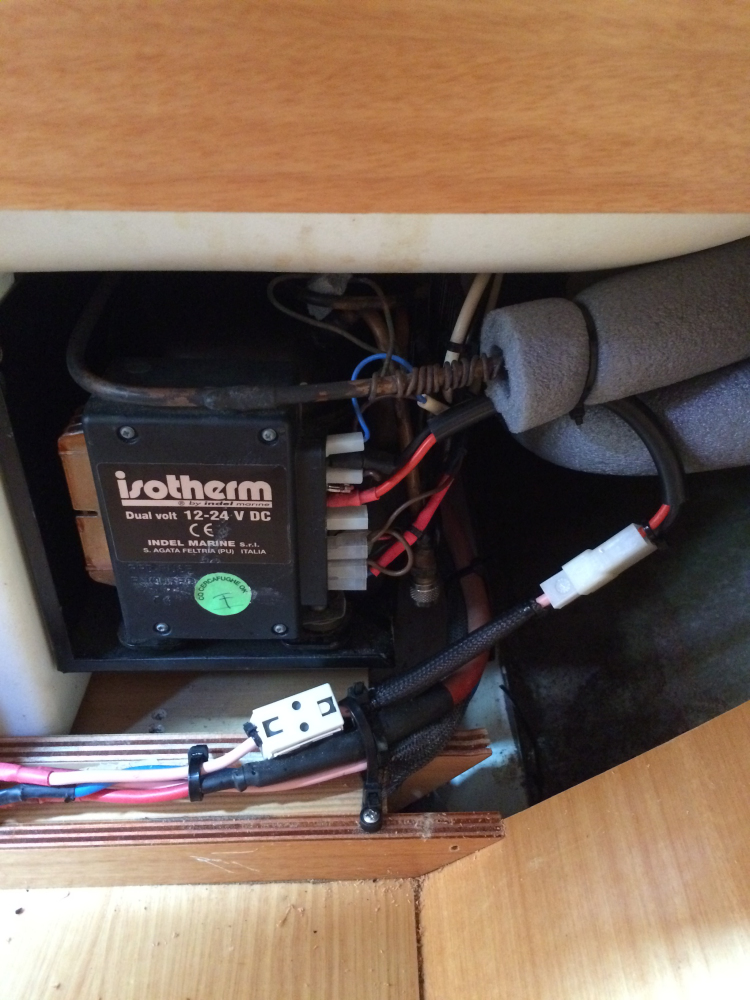
Some updates from my fridge project. All sides except the left side (the one facing the sink cabinet) has now got an additional 50 mm EPS. If needed I might add 20mm + pvc skin on the inside of the uninsulated side. I have installed the SP2351. On picture 1 is the water cooled sp thrue hull. I had to make some space for the pipes in the front wall of the sink cabinet using my router. A semilar cutout was made in the removable part of the sofa. 
I changed the plan for the compressor and mounted it in the storage below the sofa (removable part still not mounted)  The bulkheads and front part of U-sofa refitted.  The inside wall of the cupboard with 3 mm pvc glued to the insulation. I will make a cover in the corner as well. I added some wooden pieces behind the pvc where all fittings are.  Last picture is from where the compressor use to be. Now with proper insulation and no heat source. Still some cleaning left. 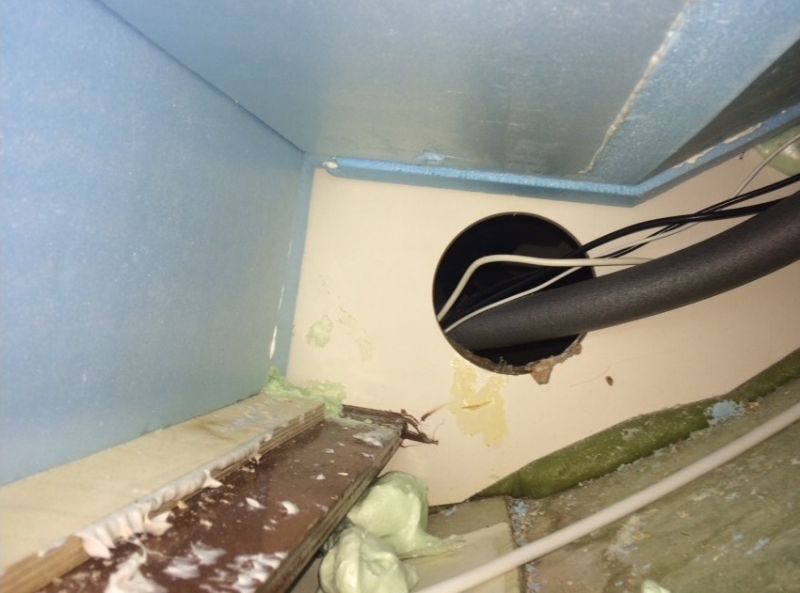 The remaining task is to finalize my arduino based controller, but I will return to that in a later post. As a teaser I Will meassure and control both freezer compartment and the fridge itself. The unit will also talk to my battery monitor to determine when to run cool down, or turn off. Rpm of the compressor will be controlled as well as an internal fan and if needed an extra fan in the compressor compartment. 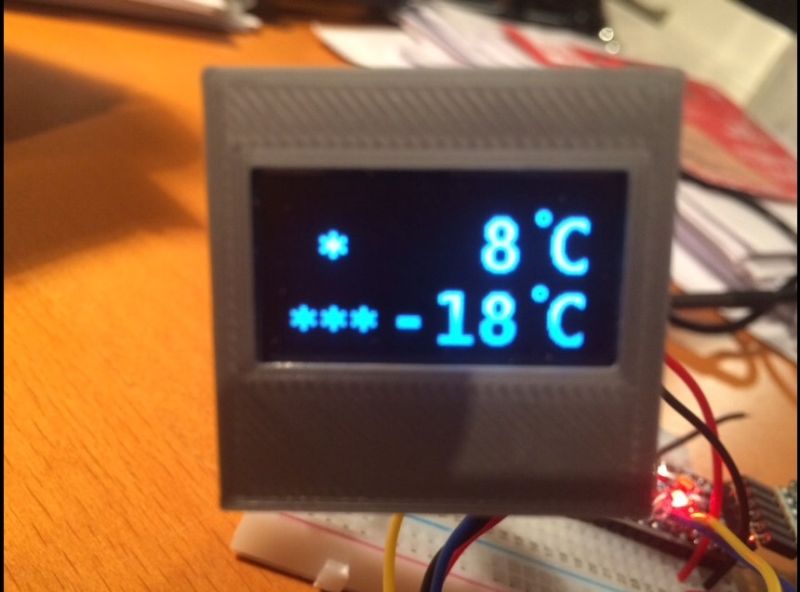 Over and out! /Jesper
------------- Jesper Hanse 400e |
Posted By: toholthe
Date Posted: 19 February 2019 at 22:49
Great work Jesper. I am finished adding fan inside fridge. Mounted above the door in the roof with a relay that will keep the fan on when lid is closed. Hopefully this will give more even temp in fridge. With new LiFePo batteries I am hoping to skip further action and just accept that fridge uses some more power than Jespers fridge.   |
Posted By: Richard M
Date Posted: 20 February 2019 at 23:44
|
Hi toholthe Can you say what LiFePo batteries you fitted (manufacturer/size etc)? Many thanks Richard ------------- Richard M (S/Y BrightStar - H 455 #90; ex S/Y Providence - H 400e #290) |
Posted By: toholthe
Date Posted: 22 February 2019 at 23:50
|
Hi, I have connected the winch to the start battery an replaced the old winch and housebatt with 2 x 100ah LiFePo4 batteries from makspower.no. This gives me the same running time as 400ah AGM batteries. Works well and charges very quick to 100%, but expendive to buy. Should last a long time so total cost might be Ok. |
Posted By: Captain Cook
Date Posted: 22 February 2019 at 23:58
|
Hi Jesper Do you have pictures of the evaporator and the routing of the tubes from the compressor? Kjeld ------------- Freya H400 #27 (2006),2-cabin, 40HP 3JH4E, 3-blade Flexofold, Aries LiftUp Windvane, Exturn 300, Jefa DD1,Simrad NX40,Icom M603(VHF)+M802(SSB) |
Posted By: jeb
Date Posted: 23 February 2019 at 07:40
|
Kjeld, The evaporator has the exact same measures as the original one. I mounted it in the exact same position. I even kept the blue "cold plate". The routing of the pipes were pretty straightforward. On the second last picture in my previous post you can se how the pipe is routed behind the fridge (covered with insulation) and then thru the bulkhead where the ventilation duct use to be. The 3rd picture shows where the compressor is mounted. On the same picture you can se a amp-meter and a nipper. They are located on the section of the sofa that I removed. So, first picture is taken from the saloon with that section of the sofa removed. The thrue hull is located in the same position as the old one but drilled to right size. I drilled a few holes from the storage where the compressor is located for the pipes. Finally I secured the pipes with cable ties. Jesper ------------- Jesper Hanse 400e |
Posted By: jeb
Date Posted: 23 February 2019 at 07:46
|
toholthe, Looks great! Did you add door switch for both lid an door? I would also consider connecting the fan to the compressor terminal for fan. Then it will only run while the compressor is running and doors are closed. Jesper ------------- Jesper Hanse 400e |
Posted By: Richard M
Date Posted: 23 February 2019 at 12:37
|
Hi Toholthe Many thanks for this. All looks good - but as you say a little more expensive at around GBP620 vs GBP450 for AGM. One concern I'd have is the ability of the Mastervolt Chargemaster 12/50-3 to handle the combination of both AGM & Li-on batteries. I'd still have 3 AGM batteries left (engine & 2 thrusters) after changing out the 2 house batteries. Best wishes Richard ------------- Richard M (S/Y BrightStar - H 455 #90; ex S/Y Providence - H 400e #290) |
Posted By: toholthe
Date Posted: 23 February 2019 at 23:00
|
Jeb, The fan is connected to the light in the fridge. It will still run if I open the lower door.
Richard, You need to go trough the charging when switching to lithium, but I did not change anything. I have a Sterling charger with three outputs. Works well.
|
Posted By: Richard M
Date Posted: 24 February 2019 at 19:12
|
Thanks Toholthe. I've been in touch with Makspower - Mr Bruenech the Managing Director. Most helpful. Best wishes Richard ------------- Richard M (S/Y BrightStar - H 455 #90; ex S/Y Providence - H 400e #290) |
Posted By: Sportswagoneer
Date Posted: 28 May 2022 at 21:08
|
Toholte: I made the same observation as you that the fridge gets good and cold - but has a hard time when full. Considering putting in a fan like you did. How did it work out for you? Have you been able to maintain a lower temperature when full with the fan? ------------- 2010 Hanse 400 #700 Neste Sommer |
Posted By: toholthe
Date Posted: 29 May 2022 at 00:51
|
Hi, A fan helps circulate the cold air underneath the evaporator. I changed to a PC fan which is connected to the steel bar wall just inside the door. I believe it helps to keep all parts of fridge cooler, but not the power consumption.
|
Posted By: Lonlon
Date Posted: 03 September 2022 at 18:21
|
Hello everyone. I'm talking to you with a translator because I'm not good at English. I have a Hanse 400 from 2006. Would anyone have made a modification under the freezer to evacuate thawing water? Lonlon ------------- Lonlon |
Posted By: perry
Date Posted: 03 September 2022 at 20:42
|
Putting a properly functioning thermostat and an internal air circulation fan has made huge difference to my H315 fridge. My fan is a brushless motor 12v PC fan runing on abut 6 volts, its very effective witout adding much heat. Check my post :- https://www.myhanse.com/new_reply_form.asp?Quote=1&PID=112394&PN=2&TR=12" rel="nofollow - https://www.myhanse.com/new_reply_form.asp?Quote=1&PID=112394&PN=2&TR=12 note your Arduino program should/must allow a waiting time; in order that the compressor only pumps gas. The main reason of poor performance with old aneroid capsule type thermostat was short cycling, turning on compressor too early. Regards Perry Cowes, Isle of Wight UK ------------- Current Yacht Hanse 315 2007 Last Yacht Hanse 301 Round GB in 2017 |
Posted By: S&J
Date Posted: 20 July 2023 at 08:55
|
I am somewhat reluctant to reopen this thread as others have clearly succeeded where I have failed! I have the electronic thermostat and a small 12v computer fan and wanted to install these as others have done. This relates to a 458. My freezer box currently cycles between -2 and -16 or so as the compressor kicks in. This is great, but the fridge rarely gets more than 20° below the ambient temperature. With current temperature in the Med my fridge is about 16C. My challenge is how I get a cable into the fridge. I know that I could take the electric supply from the existing control unit which is in the freezer compartment and use this for the fan, but I would still need to get the temperature probe for the new thermostat into the fridge somehow. I can see the electric cable and a pipe from the compressor enter below the freezer, but I have tried pushing a thin cable snake through and it gets blocked almost immediately. Access to the area behind the freezer unit is impossible. I am just about get to the compressor by removing the panel under the cooker, but this is the limit of that I can reach. ------------- H458 #159 Primal Mediterranean cruising |
Posted By: toholthe
Date Posted: 20 July 2023 at 09:15
|
Hi, I connected the fan to the light in the fridge. You can get permanent power from here. The electronic thermostat I powered from the same place and connected to the cables that connect to the existing thermostat. That way you have two parallel thermostats, one in freezer and one in fridge. The compressor turns on if either gets below the set temp. I.e. no cables trough the box. I have now sold the boat, but on mine it worked great as long as I had the boat.
|
Posted By: Sportswagoneer
Date Posted: 20 July 2023 at 09:19
|
I believe every hole made into the fridge will have been sealed with some sort of caulk (sikaflex?) after running the cables through. So you shouldnt expect there to be existing openings. However - if youre replacing cables, you should be able to pull them out with a little force and/or insert something alongside them that can penetrate the caulk and make room for new ones. My fan is powered from the internal light bulb, using the lid switch and a relay to turn it off when the lid opens. ------------- 2010 Hanse 400 #700 Neste Sommer |
Posted By: Richard M
Date Posted: 31 July 2023 at 16:33
|
Hello Stuart I assume that the 458 layout is similar to the 455. I had to cut out the bulk head immediately in front of the 'fridge (behind the saloon seat) to gain access to be able to install additional insulation. If I can find the photos I'll email them to you (I fail to manage to attach them here). Best to you both. Richard ------------- Richard M (S/Y BrightStar - H 455 #90; ex S/Y Providence - H 400e #290) |
Posted By: Ton&Marga
Date Posted: 11 July 2025 at 08:55
|
Hallo Jeb, Your insulation project is inspiring. At this moment the Fridge in my Hanse 370 has stopped functioning properly. I am obliged to replace the complete Isotherm unit or try a repair effort. However for both options, I have to remove the compressor from its extremely narrow location. The current entrance to the space underneath the box is only through the small cupboard with the 2 drawers in between oven and fridge. From your pictures, I understand you managed to remove the compressor completely. I would very much appreciate, if you could extra explain in some detail, how you managed to do so.
|
Posted By: jeb
Date Posted: 25 July 2025 at 16:04
|
Hello Ton&Marga. It was a few years ago so I dont remember 100%. But since I cut away the majority of the wall between the cupboard and the fridge this was probably the way. I also opened a big hole in the bulkhead in front of the fridge so it might have been there as well. But, to get it out I had to cut the pipes since mine was soldered (no quick connections) ------------- Jesper Hanse 400e |
Posted By: Captain Cook
Date Posted: 26 July 2025 at 10:48
------------- Freya H400 #27 (2006),2-cabin, 40HP 3JH4E, 3-blade Flexofold, Aries LiftUp Windvane, Exturn 300, Jefa DD1,Simrad NX40,Icom M603(VHF)+M802(SSB) |
Posted By: Ton&Marga
Date Posted: 30 July 2025 at 22:53
| Thanks for all of your info and fotos. All together a difficult job to get the old Isotherm compressor out of its narrow space. Installing a new one at the same location is a challenge as well. For now, I decided to leave the old one where it is. The option to install the new one underneath the saloon seats seems to be the best alternative. |