Lewmar hatches
Printed From: myHanse.com
Category: Hints & Tips
Forum Name: 400
Forum Description: 400 Hints, Tips and News
URL: https://www.myhanse.com/forum_posts.asp?TID=11206
Printed Date: 27 March 2026 at 01:44
Software Version: Web Wiz Forums 12.06 - https://www.webwizforums.com
Topic: Lewmar hatches
Posted By: Heikki
Subject: Lewmar hatches
Date Posted: 01 February 2019 at 15:40
|
Hi, I am planning to replace the acrylics to my hatches. I know my Hanse 400e of 2006 has Lewmar hatches size 60 and obviously Mk 2, but are they low profile or medium profile? Can't find the information anywhere. I am not sure if there is any difference, but the acrylic suppliers seem to ask the profile. Any recommendations from where to purchase? Regards, Heikki ------------- Melanie Hanse 400e #121 |
Replies:
Posted By: lechamoix
Date Posted: 04 February 2019 at 10:28
|
Hi, I would try Lewmar direct. I am chasing them over the 2G flush hatches fitted to my 2009MY 400 (and leaking as I hear is typical). www.lewmar.com The website has an identifier for post 2007 fitment or contact them for earlier. techsupport@lewmar.com If anyone has had any recent success with Lewmar over replacing the 2G hatches, I would welcome your insight. From what I can see, pretty much all of them have ingress issues. Many thanks in advance. HleC |
Posted By: jefflewis
Date Posted: 06 February 2019 at 04:21
|
Hi there, I was wondering if anyone had any updates on replacing or fixing these flush hatches. 2 of mine have separated and soon will fall right off. thanks Jeff ------------- Jeff Lewis Hanse 400e Sydney |
Posted By: StavrosNZ
Date Posted: 07 February 2019 at 00:24
|
I have 2010 400 with lewmar flush hatches. All the flush series hatches on my boat (9 of them) suffered from powder coat adhesion issues and paint finish flaked of them all. Lewmar/Hanse offered replacement set but my cost to remove old ones and install the new ones. After much backward and forward i forced lewmar to make me a replacement set with anodised aluminium finish rather than powder coated. (Should be anodised from new in my humble opinion). These will now last the lifetime of the boat. Note: cabin top has balsa core, Hanse fit hatches with self tapping screws directly into balsa core relying only on Sika to keep the water out. Whilst you have your old hatches off, drill old screw holes out to 12mm and fill with epoxy, when you fit new hatches you will drill and screw into epoxy eliminating the risk of water entry into deck core. Regards acrylic covers, the flush series hatches have no rim, the rim on normal hatch protects rubber seal and glue from UV damage a fait bit. On the flush series hatch seal and glue are in direct light and therefore subject to degradation much faster. I have had external cloth covers made that cover all of the flush series hatches including side windows (port lights), these take the brunt of UV and get replaced ever 10 years but acrylic lenses stay like new. When i replaced my hatches i bedded them on non setting butyl rather than Sika or the like, no leaks in the past 5 years. Your cabin top and side flex way more than you think so any setting sealant will be problematic.
------------- Stephen 2010 H400 #691, Auckland, New Zealand |
Posted By: Heikki
Date Posted: 17 February 2019 at 17:08
|
Hi, Does anybody know wether the Lewmar hatch in the photo is Low Profile or Medium Profile? The boat is Hanse 400e #121 manufactured in 2006. Regards, Heikki 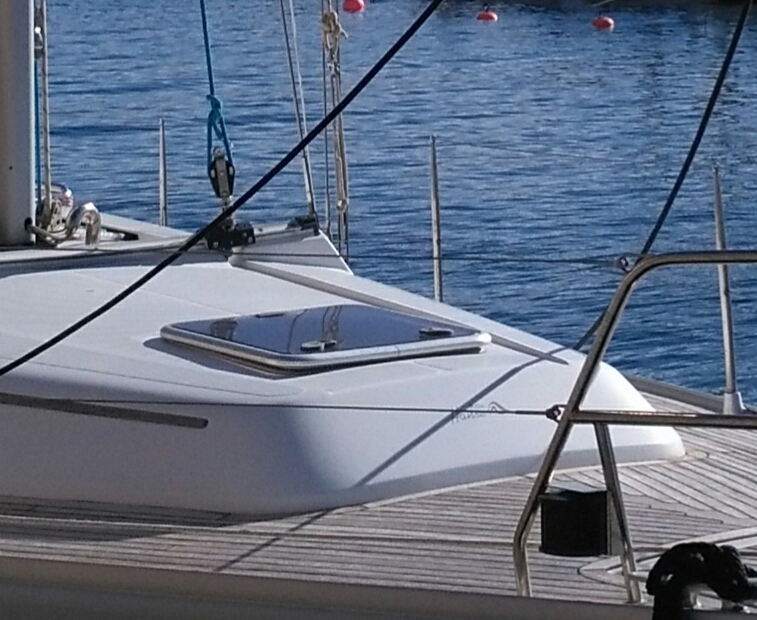 ------------- Melanie Hanse 400e #121 |
Posted By: alettaenmarcel
Date Posted: 17 February 2019 at 20:18
|
It is low profile
------------- Kids Dingys 72-79 ,Several Windsurfboards 79-86 OK dingy competitions 86-92 , Trotter Pandora Race 92-98, Friendship 28 Sport 98-05, Hanse 370 06-...... |
Posted By: Gregor
Date Posted: 04 November 2019 at 18:00
|
hi, If you search my site, youll find photos and articles on replacing the hatches and windows on my boat. Made all windows myself. ------------- Uisge Beatha Currently sailing Dehler 36 JV (2002) Previous boat: Hanse 311 #80 http://www.uisge-beatha.eu" rel="nofollow - http://www.uisge-beatha.eu |
Posted By: iemand
Date Posted: 04 November 2019 at 20:49
|
they are low profile hatches! BR Thomas ------------- Hanse 312 MJ 2004 - Hanse 370e MJ 2007 |
Posted By: Gregor
Date Posted: 04 November 2019 at 21:04
|
What do you mean with "low profile hatches"? ------------- Uisge Beatha Currently sailing Dehler 36 JV (2002) Previous boat: Hanse 311 #80 http://www.uisge-beatha.eu" rel="nofollow - http://www.uisge-beatha.eu |
Posted By: Heikki
Date Posted: 04 November 2019 at 21:20
|
Hi Gregor, Thanks for your photos! This type of Lewmar hatches are either low profile or medium profile. Medium profile is more solid than low profile, for example the acrylic is 2 mm thicker. Regards, Heikki ------------- Melanie Hanse 400e #121 |
Posted By: Gregor
Date Posted: 05 November 2019 at 05:44
|
thanks Heikki. ------------- Uisge Beatha Currently sailing Dehler 36 JV (2002) Previous boat: Hanse 311 #80 http://www.uisge-beatha.eu" rel="nofollow - http://www.uisge-beatha.eu |
Posted By: Tobyalibex
Date Posted: 29 March 2020 at 07:09
|
Good Morning All and trust that everyone is safe and well. I am looking to replace my hatches on my 400e and wondered if anyone had the actual sizes and specifications of them. Ideally I want to replace with the original Lewmar products but if they are no longer manufactured then will need the specification to get the closest I can. Any advice would be welcome. Many thanks and keep safe to all, Toby ------------- Work to Sail |
Posted By: Captain Cook
Date Posted: 29 March 2020 at 11:05
|
The "Advanced search" (which you can find at the top right of this page, by left-clicking the "Search"), gives you more than 100 hits on "Lewmar hatch" (All Forums/Any Date). In one post you will find this link, https://www.oceanchandlery.com/lewmar-replacement-low-profile-hatch-acrylics.html" rel="nofollow - https://www.oceanchandlery.com/lewmar-replacement-low-profile-hatch-acrylics.html , and in another you will be informed, that the hatch is the low profile model. Yet another tells you, theat the size is 60. Now I have done the search for you, so all that remains to be done, is compare the measures of your hatch to the measures in the link above. BR Kjeld P.S. Try also https://hanse.boatoon.com/de/shop/category/4/Ersatzteile/30/Luken%20&%20Fenster?page=0 ------------- Freya H400 #27 (2006),2-cabin, 40HP 3JH4E, 3-blade Flexofold, Aries LiftUp Windvane, Exturn 300, Jefa DD1,Simrad NX40,Icom M603(VHF)+M802(SSB) |
Posted By: Heikki
Date Posted: 29 March 2020 at 12:08
|
Hi Toby, When was your boat manufactured? The type of hatches changed from 2008. If your boat is earlier model, then you have low profile, size 60 hatches as Kjeld writes above. Normally there is no need to change the hatches totally, you can just replace the acrylics. They can be ordered directly from Lewmar as well as the new rubber sealing, which is usually also needed. I found a local guy, who made me the acrylics and ordered the sealing (Dichtungsgummi) from svb.de. Best regards, Heikki ------------- Melanie Hanse 400e #121 |
Posted By: Tobyalibex
Date Posted: 30 March 2020 at 07:07
|
Many Thanks Captain - Very much appreciated ------------- Work to Sail |
Posted By: Tobyalibex
Date Posted: 30 March 2020 at 07:08
|
Thanks Heikki - I am pre 2008 #075. Thanks for the advice and very much appreciated. I trust that you are well and keep safe. T ------------- Work to Sail |
Posted By: Sportswagoneer
Date Posted: 24 May 2020 at 08:44
|
I have a 2010 400 and my main front hatch is now flaking up in the powder coating and leaking. (The others seem fine - may have been replaced by previous owners.) After 10 years I dont really expect a warranty replacement - so my questions are: 1) What to order? As I understand these are the Lewmar flush hatches - and Im guessing theyre originally the G2 version. Theres now a G3 version. Are these interchangeable? Can I replace the G2 with a G3? Also: What color on the acrylic? The G3 exists in Dark grey and smoke grey. The G2 I can only find on the Lewmar website and only in standard color. The size for the front hatch of the H400 should be size 60? 2) How to replace it. I have some proper US Butyl tape and understand this is the sealing agent of choice. The actual procedure though is new to me. Any tips on a video or illustrated how-to for replacing the flush hatches? |
Posted By: StavrosNZ
Date Posted: 24 May 2020 at 21:41
|
G2 and G3 hatches share the same frame shape so either will fit, i would go G2 so you know all is the same. As per my earlier post i ordered anodised frames from Lewmar when i replaced all my hatches, otherwise you will get white powercoat which is the only standard finish for lewmar flush hatches. Majority of Hanse, Dehler etc using these hatches have bubbles in the powercoat or worse. Anodising will not bubble and blow off and will last a very long time. Butyl tape only works where you have high clamp force e.g bolting the frame down, when i replaced my two saloon overhead hatches i drilled through and bolted them. If you plan to screw the frames down again the use Butyl corking not tape. Dont use Sika, 3M or other caulking as it will fail. I also recommend drilling all the screw holes out as large as you can (about 12mm) filling the holes with expoxy and redrilling when you refit the frames. This ensures your screws are in epoxy not the balsa core. When Hanse fits all deck and hull hardwear above the waterline they dont seal the core. Grey lenses are what you want not the dark smoke option. ------------- Stephen 2010 H400 #691, Auckland, New Zealand |
Posted By: Sportswagoneer
Date Posted: 24 May 2020 at 21:59
|
Thanks Stavros! I believe youre now the only person on the internet to have announced the correct color!
Were you able to conceal the bolt nuts beneath the trim cassette with shade/mosquito net when you bolted through? Read your excellent post above and will acquire some epoxy! Bolting through sounds great but Im worried about fitting the nuts under the trim... I expect getting a custom made single hatch with aluminum only is simply to much of a fight (or too expensive) after 10 years... Agree fully with you that it would be preferable. The rest of my hatches show no signs of breaking up the powder coat yet - so Im crossing my fingers... |
Posted By: Sportswagoneer
Date Posted: 24 May 2020 at 22:25
|
Had to Google «butyl cork» but no luck - it just showed different tapes. This is the one I picked up in the US over Christmas: https://www.amazon.com/gp/product/B07663NFZZ/" rel="nofollow - https://www.amazon.com/gp/product/B07663NFZZ/ (European ones seem to be made for other purposes than bedding hardware...) Edit: Should be caulk off course. (Not a word Im familiar with. I can probably find this in Norway.)
|
Posted By: StavrosNZ
Date Posted: 24 May 2020 at 22:49
|
Butyl Rubber sealant or caulk is an excellent exterior sealant. Good "wetting" properties, very high modulus of elasticity, and bonds well to fiberglass, steels, aluminium, neoprene, and most glazing materials. More difficult to apply than Butyl Tape, but better choice where inadequate pressures are available to bond tape materials. Called "bubble gum" for a reason. Smooth with a finger wet with saliva (trust me) Clean up with mineral spirits before it cures. After cure tough to remove at all. (includes fingers, but it will wear off in a few days) Usually available in Black White or Grey. Spend the extra on a "pro" brand like Tremco rather than the big box store brands. Messy but very effective ------------- Stephen 2010 H400 #691, Auckland, New Zealand |
Posted By: Gregor
Date Posted: 25 May 2020 at 17:58
|
you could make them yourself. Search my site for lewmar. ------------- Uisge Beatha Currently sailing Dehler 36 JV (2002) Previous boat: Hanse 311 #80 http://www.uisge-beatha.eu" rel="nofollow - http://www.uisge-beatha.eu |
Posted By: Sportswagoneer
Date Posted: 02 June 2020 at 18:05
|
A quick update: Hanse Boatoon replies that the G2 is replaced with the G3 and offers that as their solution. The Norwegian Lewmar importer asked for the lens code imprinted in the acrylic and then replied that they can sell the acrylic only - not the full hatch with a frame. Ive made it clear that thats not an option! Im guessing that Lewmar has now discontinued the manufacturing of the G2 frames altogether and only carries a small rest inventory. Based on this I expect to be forced to get a G3 version. As long as they can supply the same color as the rest I think thatll probably be OK.
|
Posted By: Matt
Date Posted: 02 June 2020 at 18:53
|
Try Mauri Pro Sailing in Florida. They ship worldwide and on a full hatch assembly you may qualify for free shipping. They have Lewmar G2 Flush batches listed on their site. http://www.mauriprosailing.com/us/category/1-Lexmark-Flush-Hatches.hmtl" rel="nofollow - www.mauriprosailing.com I am not affiliated with them but have used them regularly as a source of equipment and always found them very helpful. Matt
------------- HANSE 445 #231 "ALBION" |
Posted By: Sportswagoneer
Date Posted: 02 June 2020 at 20:21
|
Thanks Matt! I just about ordered from them - but decided to call first and check that they actually had it in stock. Which they didnt. Ending up getting a new 2G from eBay instead. Itll be a little darker - but arrive before the summer holidays. If we think its too dark we can always change back to the old acrylic.
|
Posted By: Sportswagoneer
Date Posted: 12 June 2020 at 21:17
|
Hatch from eBay arrived today - so this weekend will be the time for the hatch project as the boat is on land after our service technician failed to properly remount the propeller and us loosing it at sea(!). (Hes getting us a new propeller on Monday - so next weekend well be back in the water.) Preparations based on good advice here has yielded me an epoxy repair kit and a Butyl caulk tube to go with the new hatch. Thank you all very much! Im expecting the old one will come out pretty easily but that therell be some moisture in the balsa core along the hatch. These are the questions Im having now: - As I drill out the old screw holes to 12mm and fill them with epoxy - Ill regard those as properly waterproofed after 24 hrs. of curing. - What about the vertical rim of the old cut-out? Should I expect moisture there as well? Should I do anything about it? - When applying the new Butyl sealant - I believe it should only go on top of the deck around the cut-out directly under the frame so that the screws will pass through the Bytul. Is this correct - or should I apply any butyl to the vertical edge of the old cut-out as well? - Ive got a fast curing epoxy that says heavy loads after 24hrs. of curing. It may be very tempting to drill them and screw in the new hatch around 20 hrs. after the epoxy repair. Any thoughts on cutting the curing time a few hours short?
------------- 2010 Hanse 400 #700 Neste Sommer |
Posted By: StavrosNZ
Date Posted: 15 June 2020 at 03:37
|
Depending on the humidity and temperature you will want at least 24 hours before drilling the epoxy. Drill the holes as large as you can without compromising the vertical sides of the hull cutout. Vertical rim should be glass so no need to seal anything up. Apply your caulking to the horizontal edges of the deck around the cut out and on the horizontal flange of the hatch, be sure hatch flange is clean of all old caulking and any contamination, clean with acetone. ------------- Stephen 2010 H400 #691, Auckland, New Zealand |
Posted By: Sportswagoneer
Date Posted: 19 June 2020 at 22:40
|
Thanks again for all your replies! Having no experience with epoxy repairs I consulted my local West system store and ended up with a GFLEX 650 repair kit. This epoxy proved to be extraordinary elastic even after a week of curing. I screwed back into it after drilling and was able to use 5.5x25mm self tappers around the frame - but the epoxy remains so elastic that even after a week, I can still keep tightening them... Im a bit sceptical about this! For now I kept the original hinge screws since I couldnt acquire the right dimension through bolts at the time of mounting. I now have those and can pretty easily upgrade - but if the other screws will remain too loose - Ill just wait a bit and see if I need to change them all. The Butyl Caulk (Terostat/Teroson 2759 from Henkel) proved very good to work with and easy to clean up, using a ball of product as flypaper along the edges. Also easy to lay down a nice thick sausage directly on the screw-holes and then just place the hatch directly on top without having to smooth it. So essentially Im now waiting for rain and heavy seas to see if the screws will come loose and leaking commence. If this happens my plan is as follows: - Re-drill the epoxy holes and re-fill with a stronger (harder) epoxy - probably the self-mixing West system SIX-10. Expend a new tube of the butyl caulk (how important is it to remove all the old stuff? Its sticky as hell.) and then screw the hatch down into the hard epoxy, drilling through for the hinges. The main barrier to keep me from just doing this is the need for some 48 hours of curing during which we shouldnt sail and it shouldnt rain. ...and the boat is rather open even if I put my tender on top of the hole... Comments still appreciated! ------------- 2010 Hanse 400 #700 Neste Sommer |
Posted By: Simon Hilde
Date Posted: 03 November 2020 at 21:58
|
Does anyone know where one can purchase mosquito netting screens for the Lewmar side windows? Thanks Simon
|
Posted By: Jackdaw
Date Posted: 04 November 2020 at 00:37
This universal one works okay: https://www.amazon.com/gp/product/B07HHYD7GF/" rel="nofollow - https://www.amazon.com/gp/product/B07HHYD7GF/ |
 Simon Hilde wrote:
Posted By: Sportswagoneer
Date Posted: 26 February 2026 at 22:47
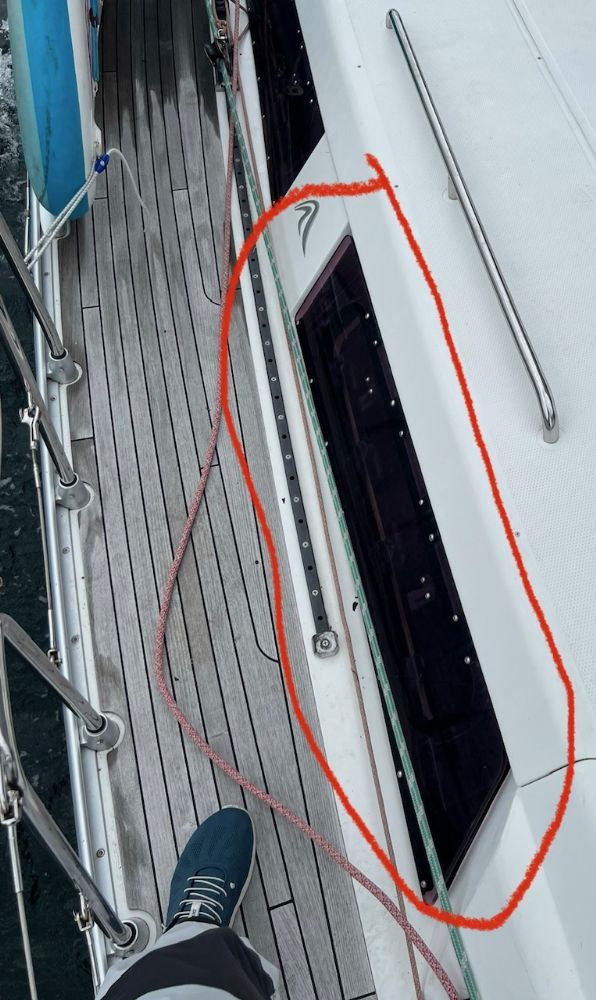
Back to replacing the flush hatches - but this time its the «portlight» in the aft head. We caught the genoa sheet under the oversized pane and got a crack in it. Only after ordering the replacement from Boatoon, I realized that these are constructed as custom flush hatches just like the ones in the deck - and not as portlights with inner clamping frames. Has anyone replaced these? Should I expect to be forced to replace the inner plastic frame as well? How hard was it to get the old ones off? And was these simply screwed into the balsa core as well - or was there any reinforcements in place? ------------- 2010 Hanse 400 #700 Neste Sommer |