SD50 Saildrive
Printed From: myHanse.com
Category: Hints & Tips
Forum Name: 430
Forum Description: 430 Hints and Tips
URL: https://www.myhanse.com/forum_posts.asp?TID=15356
Printed Date: 26 March 2026 at 23:37
Software Version: Web Wiz Forums 12.06 - https://www.webwizforums.com
Topic: SD50 Saildrive
Posted By: Issywa
Subject: SD50 Saildrive
Date Posted: 11 September 2025 at 07:35
|
I currently have my 430e hauled out for new bottom paint. Planning on trying out the Silic One product. I have heard both good and bad about it - hopefully good prevails. While the boat is on the hard, I also will do the diaphragms as well as all the other seals on the SD50. I am concerned about the longevity of the SD50 as it's 17 years old with approximately 1600 hours on it. Given that the SD50 needs to be removed, I'm wondering if I should just replace the unit with the SD60 as I will already have incurred a lot of "sunk costs" associated with the switch. Would love to hear from those of you that have done so and how that has turned out? |
Replies:
Posted By: MartinR34
Date Posted: 11 September 2025 at 12:56
I replaced my SD50 (Hanse 400) in July. The SD50 leg had corroded badly. It was an expensive switch but straightforward once I had sourced the necessary parts and researched / asked questions on this forum. A few points to note which you may find helpful:
------------- Sapphire. 2010 400 #687 |
Posted By: MartinR34
Date Posted: 11 September 2025 at 12:58
|
Will also be interested to hear how you get on with the Silic One. I was going to use it, as a lot of my hull was back to bare gelcoat so not too much prep required. However, I have heard mixed reviews and in the end went for three coats of SeaJet 034 Emperor antifouling. ------------- Sapphire. 2010 400 #687 |
Posted By: Ratbasher
Date Posted: 11 September 2025 at 18:35
|
I've detailed concerns about my own SD50 elsewhere on this forum but, helped by advice from others here, have got over them. As a result, a couple of things come to mind. Firstly, although the forums can be great there is a tendency for them to detail 'the sum of all fears'. You read of the troubles others have had and understandably worry about your own situation. Yet you'll never read about the far greater number of others that have never experienced the same malfunctions. With specific regard to the SD50, yes; the cone clutch is a well known PIA that needs regular lapping - but there's a fix for that with the upgrade kit for about $750. Mine has worked flawlessly for many hundreds of hours since upgrading and the available literature suggests this will extend the life of the clutch well beyond Yanmar's recommend for replacement at 2000 hours. Even if you did replace the clutch, the cost isn't that great. Much of my concern for my SD50 was a result of poor professional advice verging on the negligent. I got a 2nd and confirmatory 3rd opinion and it turns out I needn't have worried at all. Mine has now done 2000 hours and is running perfectly well. My second point is the familiar 'if it ain't broke don't fix it'. I went through a very similar thought-process to you so I understand your situation but if your SD50 is running fine - and given the option of the well-regarded upgrade kit - why go to all the hassle and expense that Martin has helpfully detailed? With regard to the Silic 1, I changed to that 3 years ago after I had the SD leg epoxied as per Yanmar's recommendation; the difference was remarkable with much lower levels of fouling. However, to put that in context, while Portsmouth Harbour is among the worst locations in the UK for heavy fouling we actively cruise for 5 months a year covering a lot of miles, so the way a boat is used might explain the disparity in the results you found. That all said, if you choose to save your money by not getting the SD60, your boat will soon figure out another way to reduce your bank balance by at least the same amount. Good luck! Iain ------------- H400 (2008) 'Wight Leopard' Gosport, UK |
Posted By: MartinR34
Date Posted: 11 September 2025 at 19:47
|
Great post Iain. Full of helpful insight and thoughts. I had no intention of swapping my SD50 when I viewed the boat. However, the boat had other ideas  . I had my lower leg inspected by a specialist who initially suggested a refurbed leg only due to the extensive corrosion - until he opened the oil drain plug and the oil shot out under high pressure. Something he had never seen before! . I had my lower leg inspected by a specialist who initially suggested a refurbed leg only due to the extensive corrosion - until he opened the oil drain plug and the oil shot out under high pressure. Something he had never seen before! He then advised spending a couple of thousand more and replacing the whole unit with an SD60 for peace of mind. Whether I actually needed to I don't know, as I never ran the SD50. It all span nicely however. Peace of mind with the new drive, but my original intention was simply a diaphragm / seal change and if necessary, a cone / clutch refurb as you mention. I do have both the SD50 top end and the leg in my shed and will be selling them for parts assuming they're worth something. No idea what the internals are like. Might be useful to someone on the Forum. I am in Portsmouth Harbour and I'm hoping that the SeaJet will hold some of the fouling at bay. I may re-consider Silic 1 next season or maybe in 2027! ------------- Sapphire. 2010 400 #687 |
Posted By: Issywa
Date Posted: 11 September 2025 at 19:56
|
Appreciate the comments. I have decided to keep the SD50 and refurbish the seals etc. and just stay on top of the maintenance. Also thinking I will source a spare lower leg thats in good condition. Fingers crossed on the Silic One.
|
Posted By: Issywa
Date Posted: 14 September 2025 at 06:25
|
Im being quoted 32 - 40 labor hours to remove the sail drive and redo the diaphragms and seals @ $154/ hr
. Those hours include temporarily removing the exhaust hose and elbow as well as some of the plumbing associated with the hot water heater. Does that seem reasonable? Hemorrhaging cash
.
|
Posted By: Ratbasher
Date Posted: 14 September 2025 at 08:21
|
No it doesnt. Mine was changed a couple of years ago by a two-man team in about one working day, a total of 16-17 hours. Cost was £2000 (~$2800) with the rates in my area not known for being cheap. Id ask what actual experience theyve had with such work on similar vessels as that seems to be more of a guesstimate than an estimate. Again - good luck! ------------- H400 (2008) 'Wight Leopard' Gosport, UK |
Posted By: Issywa
Date Posted: 30 September 2025 at 06:16
|
So I've pretty much convinced myself to do the SD 50 diaphragm work myself primarily because of the cost of the Silic One. If I knew then what I know now, I would not have used the Silic One. The initial quote was approximately $6900 inclusive of all taxes etc - but qualified that final cost would be based on actual hours and materials used. The argument being that in the long run, I'll save money. And that the quote is probably high. But the final bill was presented at slightly over $11,000 with some comments that extra hull preparation was required.... despite comments from the subcontractor that the hull looked good and would only need minor touchup. After some discussions, the bill was reduced to $8500 and I paid that amount. I could have dug in, and fought the fight, but I just wanted to move on. On top of that were the yard costs for haul out, pressure washing, and re-blocking of the boat after the Silic One was applied to insure complete coverage of the hull. That came out to another $2700. These costs were higher as the cure times of the Silic One resulted in the boat being on the hard for 13 days @ ~$100/day. So $11,200 for bottom paint... not justifiable in my opinion. Some folks use the acronym BOAT which stands for "break out another thousand". Clearly inflation has hit and it needs to be updated. Maybe "break out ample thousands"! I've only sailed a couple of days with the Silic One but it seems like I've picked up at least a half knot plus while motoring. But I wonder how much it would be with a conventional bottom paint? |
Posted By: Issywa
Date Posted: 01 October 2025 at 16:27
|
Martin - could you comment on where and how you split the lower leg of the SD50 to facilitate removal? Im being told that cant be done but obviously it can. Anyone out there that has self performed the sd50 removal in a 430?
|
Posted By: MartinR34
Date Posted: 01 October 2025 at 23:16
|
Yes, it was very simple. There are 8 or 10 hex bolts which secure the leg to the gearbox. These are accessed from below with a socket and extension bar (to give you room to swing the socket arm below the leg). They are not all accessible with the saildrive bolted down and you have to move it from side to side to reach all of the bolts. My engine was fully removed when I did mine which makes it easier. Don't forget to drain the oil before splitting the leg!
You'll need to separate the engine and transmission and slide the engine forward to allow the transmission to be lifted for the new diaphragms to be fitted. On the 400 it is much easier if the whole engine is removed but this needs a hoist etc. If the engine is removed you can remove the propshaft from the leg and lift the whole unit upwards and out without splitting it if preferred.
------------- Sapphire. 2010 400 #687 |
Posted By: MartinR34
Date Posted: 01 October 2025 at 23:31
Your quote appears high. Hours should be around 15-20 max and the hourly rate looks high. Although I ended up replacing the whole saildrive unit myself, the engineer I had previously booked for the diaphragm replacement had quoted £1,500 - 1-2 days work for two people. This included engine removal and refit. The exhaust hose and elbow needs to be removed (although I split the exhaust at the water trap and left the short house and elbow attached to the engine as this was easier). You also need to remove and plug the hot water calorifier hoses at the engine end.
------------- Sapphire. 2010 400 #687 |
 Issywa wrote:
Posted By: Issywa
Date Posted: 02 October 2025 at 05:49
|
When the boat was hauled, I noticed those bolts tucked up under the rubber flap that I assume prevents excess drag, and "stuff" from getting up to the underside of the sail drive. Sounds simple enough to remove those if thats all that is necessary to remove the lower leg. And of course the oil.... Last summer when I did the cone clutch "upgrade", (wondering how long that will last) there were 4 bolts that needed to be loosened but not removed - is their removal how one separates the engine and transmission? I found a manual online but it's not as detailed as I would like. Sounds like keeping the alignment of the pinion shaft is a big deal to avoid any "binding". Any tricks to suggest? I replaced the seals in the lower drive shaft while I had the boat hauled. I guess there is another seal towards the top of the lower leg that I should also replace. Any other maintenance that you suggest while the unit is accessible? Also, I'm thinking about building a frame that I can install around the engine to allow me to lift and shift the engine. Stay tuned for more details on that. Really appreciating the comments - keep them coming please. |
Posted By: jeb
Date Posted: 02 October 2025 at 09:04
|
The 4 bolts/nuts that you were backing off when removing the clutch is not the right ones (those only secures the pinion assembly). You need to remove the bolts holding the flywheel cover to the engine. If you want to separate the flywheel cover from the gearbox this is done after the separation from engine, but this is not needed for the diaphragm replacement. I did mine this winter and changed all o-rings and seals + the needle bearings in the clutch. I would also suggest that you check the vertical play of the clutch that you put hours to set up, mine hade increased from 0.2 to 0.4mm since i did the original install of the upgrade kit. Also the gear selector play should be checked, but use Yanmars method and not Guedions since his will give a to big play (should be 0,2-0,4 while he say "back off one turn" that will be to much) ------------- Jesper Hanse 400e |
Posted By: Mark_J1
Date Posted: 02 October 2025 at 14:24
|
This shot might help. This is my SD50, inverted, & held on an engine house frame. The separation of the leg isnt to tough. Just a case of creating access. On the 400e that means the engine slid forward to allow the upper portion of the drive to come out vertically and upward while the leg is released downwards. I had professional help with this job so I wont claim a DIY tick! Does definitely help to have 2 people, one in the boat and one outside. ------------- Hanse 400e "Grey Goose" Hull #31 |
Posted By: MartinR34
Date Posted: 02 October 2025 at 15:31
|
I bought myself a car gearbox hoist / jack - £40 on Amazon. The kind of tool used when a car is raised on a lift and the gearbox is dropped out the bottom. It has a height reach of around 1.75m from the ground so I was able to place this under the saildrive to provide support whilst separating and re-mating the engine and gearbox driveshaft. Very helpful, but I agree that two people plus this would have been even easier! ------------- Sapphire. 2010 400 #687 |
Posted By: Issywa
Date Posted: 02 October 2025 at 16:18
| Not sure if its my computer, but I'm unable to see your photos? |
Posted By: Mark_J1
Date Posted: 04 October 2025 at 20:56
|
Not sure what went wrong on the uploads. Here's the 2 missing photos. Mark 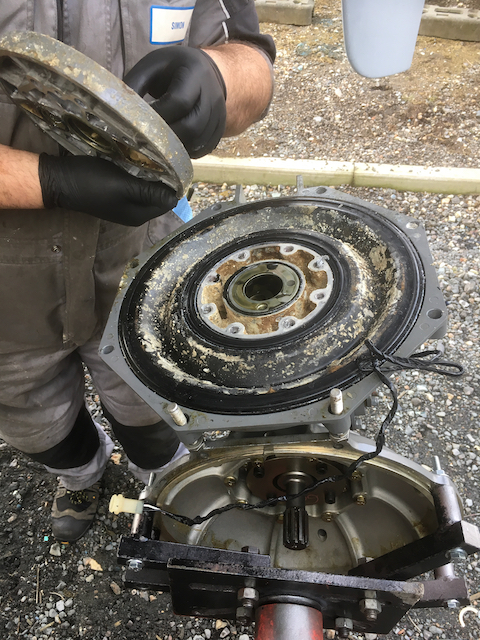 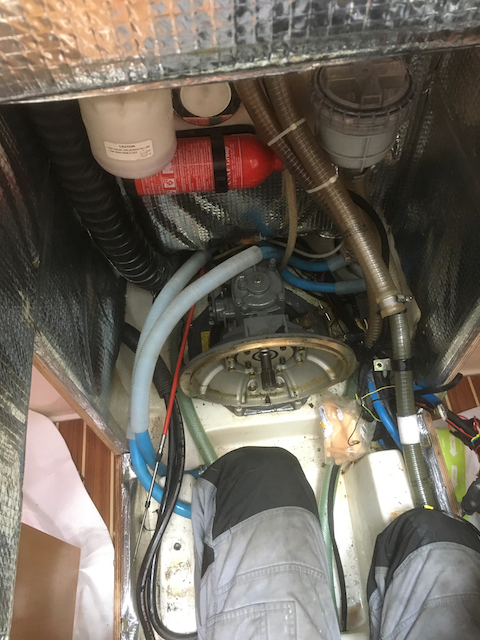 ------------- Hanse 400e "Grey Goose" Hull #31 |
Posted By: Issywa
Date Posted: 05 October 2025 at 16:58
| Did you have to support the sail drive while removing the engine? Ive seen some posts where that was done but Im not sure why - seems to me that the sail drive is supported by the rear isolation mount and per your photo, bolts into the engine bed. |
Posted By: MartinR34
Date Posted: 05 October 2025 at 17:50
|
I didn't support mine for removal but did to re-mate the engine on installation. ------------- Sapphire. 2010 400 #687 |
Posted By: Issywa
Date Posted: 05 October 2025 at 22:09
|
Good - confirms what I was thinking. I plan on removing the lower leg, then separate the engine, shift it and then remove the sail drive. Hopefully all goes well
🤞🤞🤞
|
Posted By: Issywa
Date Posted: 14 October 2025 at 22:39
|
Ill follow up with more details in another post but I am having a problem with the prop shaft binding. I separated the lower unit from the upper to facilitate removal but am wondering if I messed up the tolerances in the vertical drive shaft. I can freely rotate the pinion gear but not after I insert the lower bearings that contain the prop shaft. Any suggestions? |
Posted By: Issywa
Date Posted: 10 November 2025 at 16:47
|
So prop wasnt turning properly because I put the coupler in upside down while connecting the lower and upper drives. This caused a misalignment of the prop shaft and wouldnt allow the housing that contains the lower seals etc to properly seat. Because I belong to the Bigger Hammer Club, I forced it on which in turn ruined the housing, bearing and the raceway that it sits in. I also had to replace the seals because I was unable to remove them without compromising their integrity. Upon realizing that I had messed up the lower housing (obvious because it cracked), I was pretty annoyed (understatement) with myself which in my case gave me enough determination that I immediately started to dismantle things that I had just reassembled and lifted the entire SD50 out and over the engine by myself. At this point, I brought it to a mechanic who replaced the damaged parts for me at no small cost. So the moral of the story is to clearly read and understand the manual (RTFM) and dont force parts together. In my self defense, the manual I had sucks
. Did I mention that a boat can not only rejuvenate your soul, but also suck it out!
|
Posted By: MartinR34
Date Posted: 10 November 2025 at 16:58
|
Sorry to hear that but easily done. I too had a tendency to subscribe to the 'Bigger Hammer Club' but have got a lot better at taking a step back and thinking things through. Mainly because not doing so can get expensive!! Hopefully you'll be able to get it all back together and back in the water soon. ------------- Sapphire. 2010 400 #687 |
Posted By: Issywa
Date Posted: 10 November 2025 at 18:34
|
All good now and back on in the water. I should also note that the diaphragms looked like they were brand new. What a crock replacing them at 7? years per Yanmar.
|
Posted By: Hanse111111
Date Posted: 27 February 2026 at 14:26
|
Has anyone on a Hanse 430e (4JH4AE + SD50) replaced the SD50 with an SD60? I'm looking for real-world experience specific to the 430 platform. Specifically: Trying to determine if this is a straightforward upgrade or a structural project. |
Posted By: Issywa
Date Posted: 07 March 2026 at 04:13
|
Following your post with interest. I contemplated replacing my SD50 with the SD60 last summer but opted not to. If I could go back in time, I would have done so as the costs that I incurred for new seals, repair of some bearings that I messed up etc would have contributed greatly to the cost of the new saildrive.
Anyway, when I spoke to the local shop, they advised that a new adapter plate would be required which in turn would require some realignment of the Yanmar. As I recall, they were spitballing budgets north of $20k - enough that if/when I need to do the work, I will undertake it myself. So I'm wondering if you have any update? |