Reduce compressor running time with up to 50%
Printed From: myHanse.com
Category: General
Forum Name: Chit Chat
Forum Description: Talk about anything to do with your boat
URL: https://www.myhanse.com/forum_posts.asp?TID=5008
Printed Date: 27 March 2026 at 03:40
Software Version: Web Wiz Forums 12.06 - https://www.webwizforums.com
Topic: Reduce compressor running time with up to 50%
Posted By: skipper
Subject: Reduce compressor running time with up to 50%
Date Posted: 16 April 2011 at 12:13
|
We do very seldom have shore power due to that we love to moor to islands in the archipelago (and I have a mindset of a Scottish person, the additional fees for shore power in the Swedish harbours are too high for me). After we installed a 75 W solar panel do we have a rather good energy balance but I want to improve the battery status even more to enable me to invest in new toys to the boatJ Run the engine more time each day isnt an option when we want to have a green profile and a wind generator isnt an option for us in this stage. When I understood that our refrigerator box was of a robust construction but without insulation did I realize what to do. Why should you insulate your fridge box?
What insulation to be used? My recommendation is to use high quality products to achieve the best result when the space is very limited (20-30 mm on our 342, other galleys may have more space) either as extruded polyurethane insulation (hard panels), armaflex (soft panels) or 2 part/components PU foam. I considered several insulation options and finally thought it was easiest for us to use PU foam and we have been warned by professionals that never use 1 part PU foam to a fridge in a boat due to that it will capture the humidity in the air. So 2 part PU foam will give us a good insulation, it wont capture water over time, it is rather easy to spray and after 15 minutes will it stop to expand (at 20 Celsius degrees). Our high level plan Insulate the black plastic tube for the heating system of the boat in the area around the refrigerator box and the compressor. Increase the ventilation area behind the black plastic grid there warm air is supposed to came from the compressor into the saloon (the shipyard only makes 2 round holes through the GRP). Prepare for future change of compressor and evaporator. Use insulation tubes round the copper connection between compressor and evaporator. Use insulation panels as a wall towards the sink and under the wooden shelf that the box stands on. Use foam in the wall towards the sofa and the stove (20-30 mm) Use foam in the space between the box and the hull (100-200 mm) Preparation will be time consuming but the foaming will be a rather easy task to do The ventilation grid between the compressor och the saloon have 2 round holes cut through the GRP made by the shipyard, I believe that my small improvement done by a rasp will make the transportation of warm air a little easier to pass the grid.
Preparations:
I removed the wood hatch behind the sofa to inspect how it looks between the hull and the backside of the sofa, the wooden plate/bulkhead behind the sofa close to the fridge will prevent the foam from being spread from the space between fridge-hull.
Insulate cooling tube and air-heating tube The image below shows how it looks like before I insulated the black plastic heating tube and the white thin copper tube for the fridge. I removed parts of the edge on the wood shelf to make it easier to work below it. 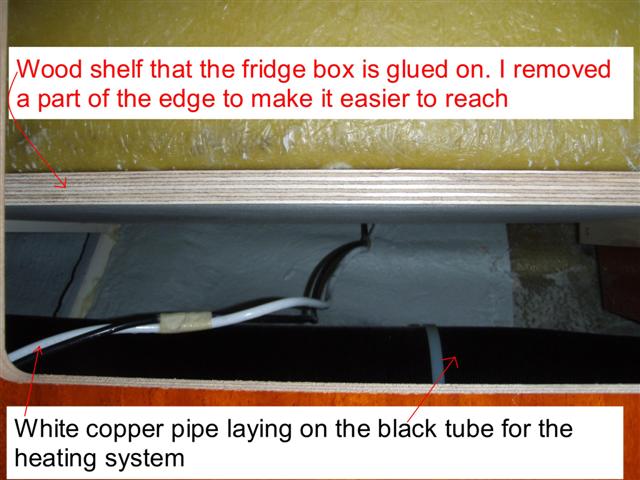 Foam blocker Foam pipe insulation did I use around the white copper pipe and as foam blocker between the inner liner and the hull at both side of the fridge box. I dont want to fill the whole space (inner liner and hull) on starboard side. I tested to put a small foam pipe inside a larger one but I was not strong enough to push them in place. For me did it work better to combine 2 of the same size and push them in place towards the hull.   Sofa-Fridge
Stove-Fridge
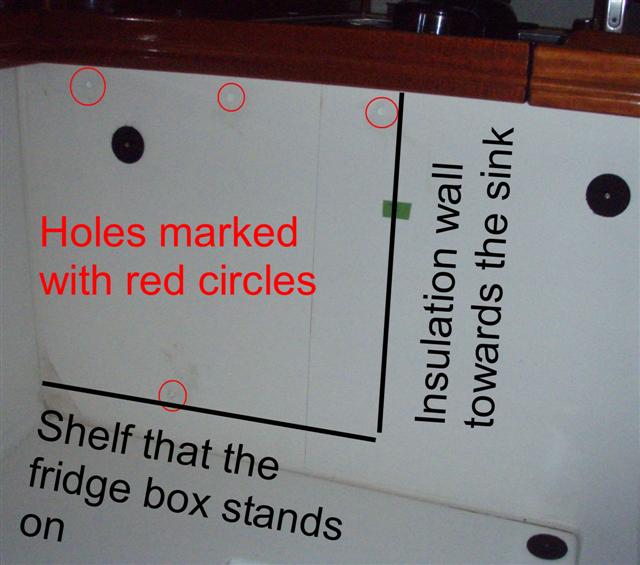
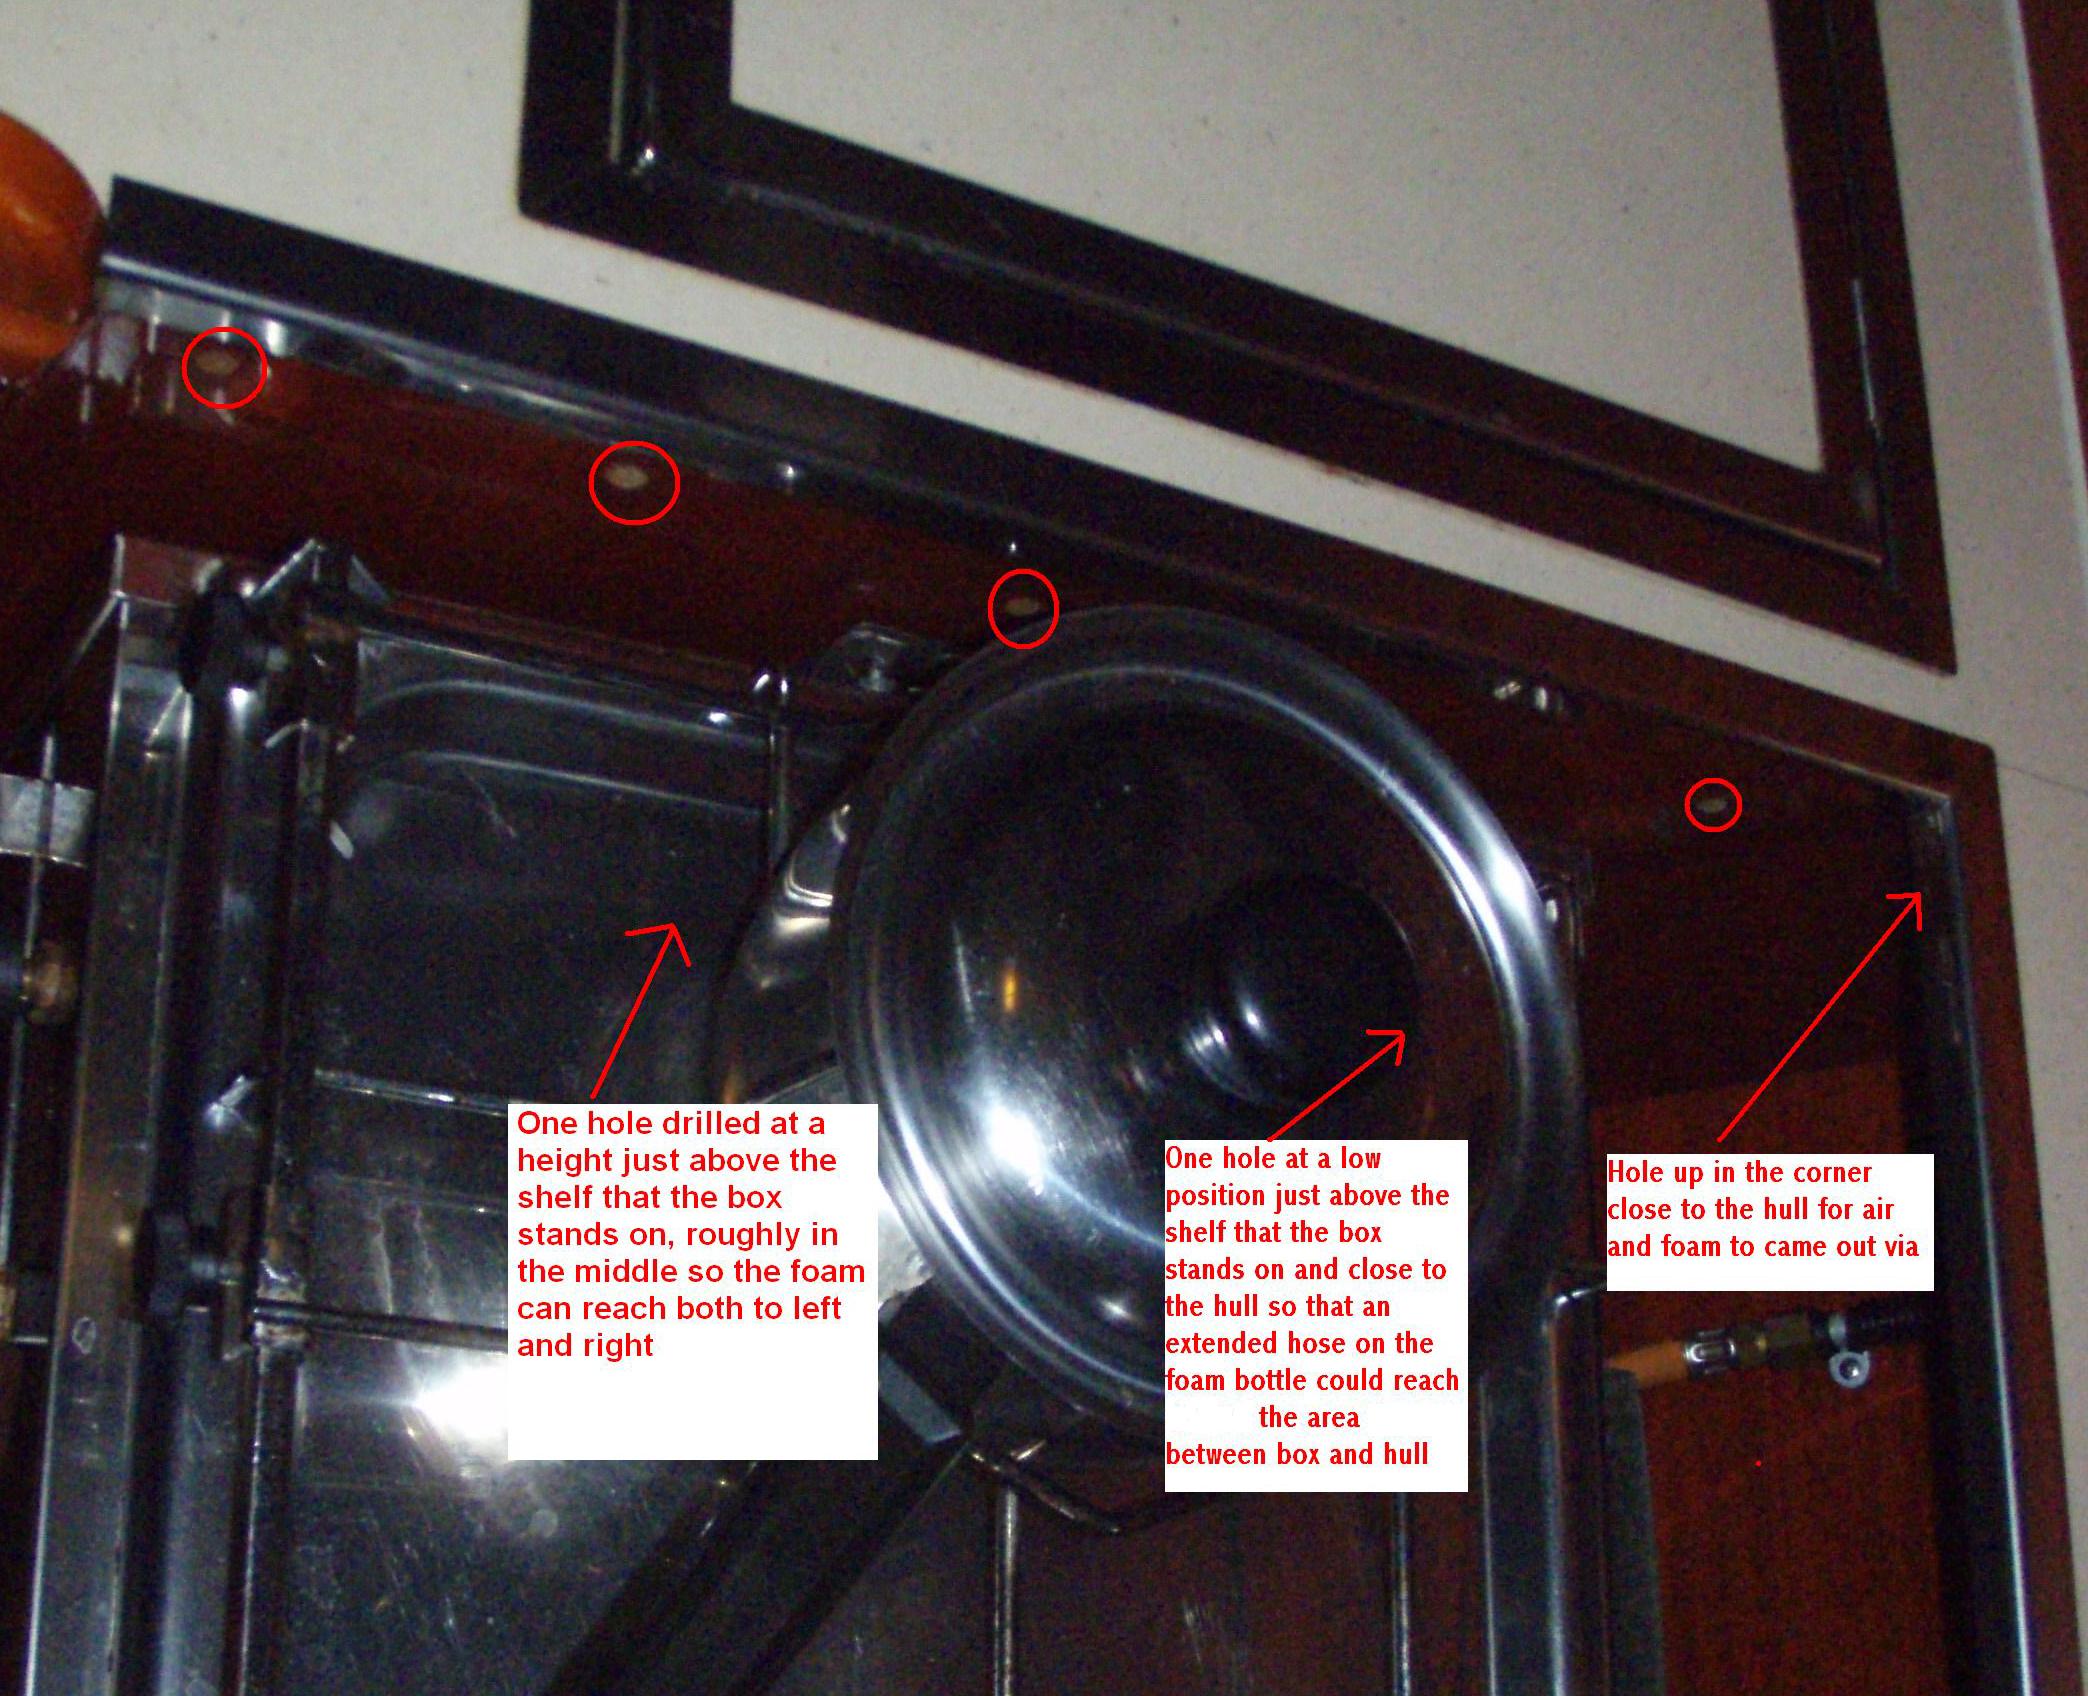
Lid/Hatch I removed the screws from; the hinge at the back of the hatch, the stainless steel spring hatch holder and the flushed lift ring (the top is made of 12 mm thick wood plate). The wood below the lift ring were removed with a Dremel so that I could see into the empty space in the hatch. I decided to drill one hole on the edge were the hinge were located (this hole wont be visible when the fridge is in operation). Use protection tape around the holes and were you suspect that the foam will come out from the inside. The 3 screws holding the lift ring could be exchanged with shorter ones (metal transfer the cool ). Execution time Remember to protect everything because the foam is more or less impossible to remove afterwards. I bought 9 bottles with 2 part PU foam and re-used leftover insulation plates from 2 other fridges:
Put the hose from the bottle at the lowest drilled hole and inject the foam. Use a spatel to remove the foaming coming out from the top holes. After approximately 15 minutes has the chemical process ended. Acetone can be used to clean on the white walls but NOT on mahogany walls (the varnish will be removed as well). I extended the hose that come with the foam bottle so that I could reach behind the box towards the hull (used 80 cm long plastic hoses that were planned for ventilation of batteries). MEASURED AFFECT Before I insulated would I say that the compressor were running 40% of the time during the Swedish summer period. In September (2010) did I measured that the compressor were running 10% of the time (running 1,5 minute and idle 12 minutes, 20 Celsius degrees inside in the saloon and seatemperature 13-14). I set the temperature control on 4,5 and got 1-2 Celsius degrees on the bottom/5-6 at the top in the basket. I will update this thread when I have measured the coming summer. Even with 20% running time have I improved the energy budget with 0.2 x 24 x 5 (rough estimation) = 24 Ampere-hours per day. Checklist Paper towels Spatel Carry bags for waste Acetone Gloves Protection tape Extension hoses to the foaming bottles 2 part/component Polyurethane foam from Danalim http://www.danalim.com/produktkatalog/byggeri/fugeskum/2c-polyurethane-foam-596/" rel="nofollow - References: http://www.spray-insulation.co.uk/" rel="nofollow - http://www.kollmann-marine.com/insulation.html" rel="nofollow - http://www.yacht-sailboat.com/marine-refrigeration.html" rel="nofollow - http://www.maringret.110mb.com/articles/refrigerationFAQ.html" rel="nofollow - Cindy's Island, Hanse 342, the most insulated box I ever had read about, search for refrigerator down on the web page
http://cindysisland.wordpress.com/category/boat-projects/galley/" rel="nofollow - http://cindysisland.wordpress.com/category/boat-projects/galley/ Foam agent in Sweden: Berteco in Stenkullen, outside Göteborg. http://www.berteco.se/" rel="nofollow - |
Replies:
Posted By: gizmo
Date Posted: 17 April 2011 at 11:00
|
Well done Skipper. Thats a big saving on battery draw I will take a look at mine this year.
Ken
|
Posted By: samuel
Date Posted: 18 April 2011 at 07:14
|
My experience with these foam products is that if you exclude air from the material when applying they tun to mush
For instance I poured some in a plastic bottle ( to make a float for a particular model project) & the stuff just did not work.
You must have had lots of air round it so it cured properly or you had a better foam product
For those that do not want to go to this expense & where you can get access to an item being insulated there is a product I have used in the building trade for some years with succes
It is Trio Iso super 10 ( google it for details)
It is a cloth like product 20 mm thick but because of its design it is equivalent to 230 mm of glass wool
It can be squeezed to less than 10mm ,easily wraped around things & stuffed into voids. does not seem to absorb much moisture & could be useful for insulating areas on a boat
You have to buy a roll but what you do not use will serve well in the loft !!
If you have some friends who also could use some then the expense is not so great
Daydream Believer ------------- Daydream Believer- Hanse 311- No GBR9917T- Bradwell Essex |
Posted By: CharlesP
Date Posted: 18 April 2011 at 09:16
|
Thank you Skipper for showing us in detail how to do this work. Excellent.
Charles ------------- 'MERIDIAN LADY' 320 Nr 536 2010 Medway |
Posted By: holby
Date Posted: 18 April 2011 at 09:34
|
Skipper, Good clear information especially for me. I have no experiance of this kind of expanding foam spray. Out of interest if your fridge has to be removed for repair/replace, how will this affect this ? Cheers Dave
------------- Hanse 301, tiller steering, Volvo 2010 (10hp) 
|
Posted By: Johan Hackman
Date Posted: 18 April 2011 at 09:54
|
Dave, if you are a lucky sod to being able to remove the fridge you won't even have to use foam. In a 342 you will have to remove the deck from the hull to remove the fridge. That's how they are built.
Skipper, thanks for sharing this excellent information. Good job! Johan -------------  http://www.johanhackman.se" rel="nofollow - http://www.johanhackman.se |
Posted By: Gregor
Date Posted: 18 April 2011 at 14:31
|
Nice job! I did some work on the fridge too. Beside installing foam around the thin isulated box, I also added a fan to get cool air from under the gouge (water tank is installed there) and blow that onto the compressor. This keeps the compressor much cooler and it gives a better air circulation. Due to a cooler compressor, less heat will float along the fridge box. See fourth picture of the link showing the pictures on my site. http://www.uisge-beatha.eu/index.php?mact=Album,m54235,default,1&m54235albumid=58&m54235returnid=63&page=63 - http://www.uisge-beatha.eu/index.php?mact=Album,m54235,default,1&m54235albumid=58&m54235returnid=63&page=63 Gregor ------------- Uisge Beatha Currently sailing Dehler 36 JV (2002) Previous boat: Hanse 311 #80 http://www.uisge-beatha.eu" rel="nofollow - http://www.uisge-beatha.eu |
Posted By: holby
Date Posted: 18 April 2011 at 14:40
|
Johan, I am no expert on things like this, as I am sure you are aware, but it seems to me that the cool box should be able to removed, and the compressor for the "coolbox" is under the starboard bunk with a fan into the saloon to keep it cool and circulate the air. The cooling plate in the coolbox, i think was added as a later item. Out of interest is the compressor as one unit with your fridge or as extra equipment under a bunk? Dave ------------- Hanse 301, tiller steering, Volvo 2010 (10hp)
|
Posted By: skipper
Date Posted: 18 April 2011 at 15:21
|
Thanks for the feedback, in most cases is the hard thing to figure out how to do it, not to execute the plan. This forum is a great place to share and I know from face 2 face meeting with other Hanse sailors that many are doing things that could be shared here as well. ------------------
Regarding the question how to replace the compressor and the evaporator in the future. This is something I have tried to prepare by initially put a round grey insulation pipe around the white copper pipe between the compressor and the evaporator. I wrapped both the white copper and the black electric wire with a foam pipe, pushed it from below which means from the space under the wooden shelf. My idea is that this shall prevent the PU foam to get in contact with the white copper and the black electric wire.
By using insulation panels below the wooden shelf will it be easy to remove them the day I have to switch cooling system.
I hope my explanation in broken english is possible to follow, if not let me know.
-----------------------------------------------
From the Swedish forum do I know that the space around the fridge box can be very different. So if there is bigger space around the box insulation plates could be the best choice. This is a rather easy job to do and from a cost perspective can I really recommend it as the first step to get a better energy budget.
Fridge insulation combined with use of LED lamps are the initial improvements, if not enough solarpanel is always good to have to recharge the batteries.
------------- Cheers, Skipper Former owner of Hanse 342 2005 (Sparcraft mast, white hull, wheel steering, deep draft keel, short rudder) |
Posted By: Chris G
Date Posted: 19 April 2011 at 06:51
WoW!  ------------- H411 "Equinox" |
Posted By: Johan Hackman
Date Posted: 19 April 2011 at 07:47
Dave, if you take a look at http://www.myhanse.com/forum_posts.asp?TID=4583 - this thread about how the 341/342 was built you will understand from the pictures that you don't just remove the fridge. My compressor is under the starboard bunk, as a separate unit. Johan ------------- http://www.johanhackman.se" rel="nofollow - http://www.johanhackman.se |
 holby wrote:
Posted By: skipper
Date Posted: 27 January 2012 at 08:42
"Bynnos" showed me last summer that we still got condensation on the wall behind the sofa towards the fridge so I will buy this to improve the ventilation.
  ------------- Cheers, Skipper Former owner of Hanse 342 2005 (Sparcraft mast, white hull, wheel steering, deep draft keel, short rudder) |
Posted By: samuel
Date Posted: 27 January 2012 at 11:30
|
I have that ( the white one)under my aft & forward bunk cusions & it is turned up at the sides to get ventilation to it
After 1 season I can conclude that it does not work !!! ------------- Daydream Believer- Hanse 311- No GBR9917T- Bradwell Essex |
Posted By: CharlesP
Date Posted: 27 January 2012 at 20:28
|
Thanks Samuel. You've saved me a pile of money. We just stick a fender under the bed during the day from time to time so air can circulate. Suggest a small spacer, such as a length of pipe, be put behind the 'fridge' cushion overnight or when not in use to similarly allow air circulation. Charles ------------- 'MERIDIAN LADY' 320 Nr 536 2010 Medway |
Posted By: skipper
Date Posted: 28 January 2012 at 12:18
|
Hijackers, what about starting a new thread on subject "ventilations" so that we could gather together different working solutions to improve comfort onboard....
------------- Cheers, Skipper Former owner of Hanse 342 2005 (Sparcraft mast, white hull, wheel steering, deep draft keel, short rudder) |
Posted By: CharlesP
Date Posted: 29 January 2012 at 01:53
|
Don't know what you're thinking. Not hijacking. The posts are related to your Own post by advising you that you may be wasting your money on something that may not work and, that natural air circulation can be the best way of alleviating local condensation. Charles ------------- 'MERIDIAN LADY' 320 Nr 536 2010 Medway |
Posted By: Lippe
Date Posted: 29 January 2012 at 10:13
| There is currently ongoing discussion about ventilation on 461/470 forum |
Posted By: holby
Date Posted: 29 January 2012 at 10:21
But that is ventilation on 461/470's, not on these other models. Talking of other models, my 301 does not seem to have a the problem of the fridge causing condensation problems at the back of the seat cushions, the must have figured out how to solve it....  ------------- Hanse 301, tiller steering, Volvo 2010 (10hp)
|
Posted By: H8jer
Date Posted: 21 April 2012 at 21:34
|
Hi Skipper What did you do to insulate the Lid/hatch? I have measured my fridge and it looks like it has 2 cm insulation build in the glassfiber. Have anyone drilled a hole in the box, that can confirm that? ------------- Hanse 370#487 30HP 3-cabin |
Posted By: skipper
Date Posted: 23 April 2012 at 10:16
|
2 parts pu foam, for detaljs please ser the First page of this post. Over the years and yacht models could the insulation (or lack of it) be very different. I can only describe our yacht model. ------------- Cheers, Skipper Former owner of Hanse 342 2005 (Sparcraft mast, white hull, wheel steering, deep draft keel, short rudder) |
Posted By: skipper
Date Posted: 23 April 2012 at 10:18
|
2 parts pu foam, for details please read the First page of this post. Over the years and yacht models could the insulation (or lack of it) be very different. I can only describe our yacht model. Here is another insulation yacht project, sharing my view on the benefit with 2 part PU foam http://mjsailing.com/projects/refrigeration-insulation-spray-foam/" rel="nofollow - http://mjsailing.com/projects/refrigeration-insulation-spray-foam/ ------------- Cheers, Skipper Former owner of Hanse 342 2005 (Sparcraft mast, white hull, wheel steering, deep draft keel, short rudder) |
Posted By: MarcoC
Date Posted: 24 April 2012 at 09:46
|
Anyone who has done same job on a 370 as Skipper done on his boat? It would be nice to hear how you you did it. We have condence problem with the back of the saloon sofas and dont know how to get rid of the mold stains. But w elike to prevent future problems by having a better insulation. ------------- "Älva" Hanse 370#671 Stockholm, Sweden http://www.wesailhanse.se" rel="nofollow - www.wesailhanse.se big wheel, deep draught iron keel, 3 cabins,Yanmar 3JH4E, Sparcraft rig. |
Posted By: Markku
Date Posted: 24 April 2012 at 16:11
|
I'm going to do similar job by using flexible thermal insulation plate which will be pushed and pulled in place, first around the walls and then separate piece under the box. As preparation, I already cut a large square shape hole to the wall behind the cushion to allow better reach to the area. I don't know yet how to tight the insulation in place, perhaps with glue or pulling around some wire or thin rope. It will be anyway hidden so perfect look is not important, just that we will have better insulation to reduce compressor operation time. I haven't noticed that we had any moisture problem probably due to some free space between the box and interior walls. ------------- S/Y Flow Hanse 371 |
Posted By: Idelfix Too
Date Posted: 24 April 2012 at 21:28
|
It is a joint between the refrigerator's two parts that are badly twisted. They two parts widens probably when the fridge is cold. I've tried to come out with a thin knife between the 2 parts and found major gaps in the fridge when cold. But they disappear again when it is turned off and gets warmer. If this slot opens up inside the wall against the cushion, it may cause condensation I have sealed the joint with Sikaflex and I will post info when it is test driven 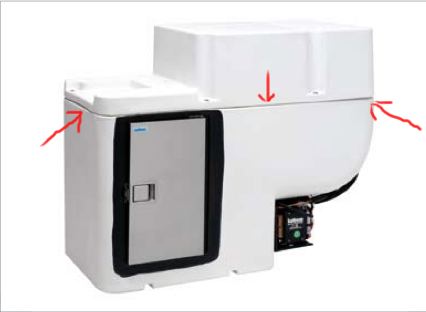  ------------- "Idelfix too" Hanse 430e -08 Keep sailing in free wind http://suhrfa.blogspot.se |
Posted By: skipper
Date Posted: 31 July 2013 at 09:45
|
Measured compressor running time on a typical Swedish summerday morning around 10, seawatertemp 20 degrees Celcius, the lady onboard has put the control on "7", 15 cm from top of box 5 degrees C . Compressor idle time 8:20 = 500 seconds, running time 1:10 = 70 sec. Fantastic figures 70 / 570 = 13% running time Check your running time and consider if it is worth the effort to insulate your fridge or not, at least on older yachts cold be constructured as ours without any insulation. Measured a second time in the afternoon of a warmer day, 22% running time more in line with my measurement 1-2 years ago. Still evidence that the insulation has payed off . Cheers Skipper ------------- Cheers, Skipper Former owner of Hanse 342 2005 (Sparcraft mast, white hull, wheel steering, deep draft keel, short rudder) |
Posted By: Gregor
Date Posted: 31 July 2013 at 21:48
|
With all improvements and changes I made (look at my website for the story and photo's), if the cabin temperature is 25 degr. I set the thermostat on 3, the inside temp becomes 5-7degr. It runs 4 times p/h for 1'30" to 1'45" Not too bad, if I may say so :) Gregor ------------- Uisge Beatha Currently sailing Dehler 36 JV (2002) Previous boat: Hanse 311 #80 http://www.uisge-beatha.eu" rel="nofollow - http://www.uisge-beatha.eu |
Posted By: skipper
Date Posted: 01 August 2013 at 15:55
|
My personal view on the condensation issue is that warm air meets a cold wall behind the sofa and as Bynos friendly made me aware of do we still suffer of condensation even with the improved insulation
------------- Cheers, Skipper Former owner of Hanse 342 2005 (Sparcraft mast, white hull, wheel steering, deep draft keel, short rudder) |
Posted By: H8jer
Date Posted: 03 August 2013 at 15:47
|
Hi Skipper and Gregor With those readings on running time - can you then stay at almost 100 % if you got a solar-panel? what do you think? About condensation. Here is a picture of the cooler box bottom, Yes it is all water drops. The box has 20-30 mm foam built in from the factory. But looks like that needs to be improved. 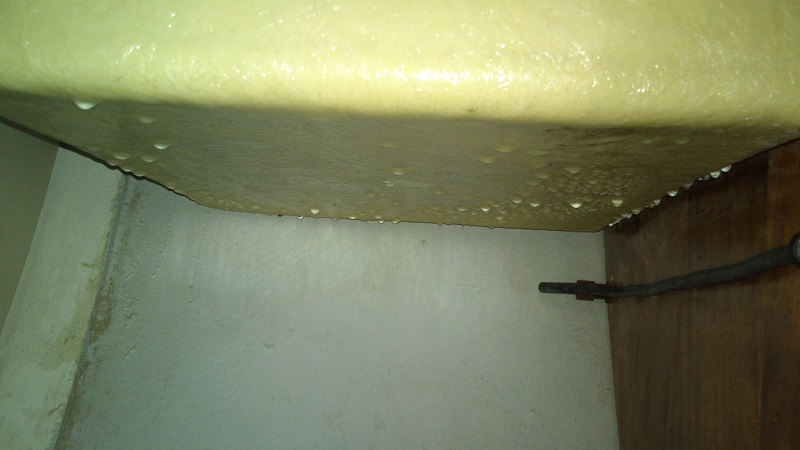 Last season I had to emergency replace the compressor, due to the old one had a fluid leak. I am still learning how to manage the settings, so the milk is not frozen. I use a wireless thermometer in a plastic bag. /H8jer ------------- Hanse 370#487 30HP 3-cabin |
Posted By: Fendant
Date Posted: 03 August 2013 at 18:47
|
Well it looks as if I have a serious problem with my fridge on a Hanse 345. Water Temp currently is 24 deg C and cabin inside is 28 - 30 deg. I have installed a wireless temp sensor on the back wall 20 cm below the top opening.
Temp set was adjusted to max! Nevertheless the fride does not cool below 13- 15 deg. C?
Any suggestions are "coldly" welcomed
|
Posted By: Gregor
Date Posted: 04 August 2013 at 22:27
|
@H8jer, serious condensation. You van put extra insulation material at the bottom an aside, however it does not help very much. A little bit better than it is by now. @Fendant you can try to have your compressor refilled. Probably with R134a. If there is not enough gas inside, the cooling is poor.This can be done by yourself if you have the right nipple for the compressor. Having an engineer coming over is expensive, at least in The Netherlands. Gregor ------------- Uisge Beatha Currently sailing Dehler 36 JV (2002) Previous boat: Hanse 311 #80 http://www.uisge-beatha.eu" rel="nofollow - http://www.uisge-beatha.eu |
Posted By: skipper
Date Posted: 05 August 2013 at 05:28
Not sure if I understand your question perfectly, we have a 75 W solarpanel fixed on the "garageroof" and in the home port did I manage to empty the battery bank when I forgot the fridge on. Not sure if the shadow of the mast and boom prevented the sunbeams to hit the solarpanel. When laying still in the archipelago with crew moving the boom to let the sun hit the solarpanel do we have energy enough for fridge and LED lights without running the engine. The batteries are from 2006 and we have 80+110+110 in one bank protected by a "battery-brain" disconnecting the "start battery" at xx.x volts ------------- Cheers, Skipper Former owner of Hanse 342 2005 (Sparcraft mast, white hull, wheel steering, deep draft keel, short rudder) |
Posted By: piquet
Date Posted: 31 October 2013 at 04:50
|
Just a heads up on managing energy and compressor rub time more efficiently. I have installed a Smart Energy Control onto my Webasto fridge. I came across this at the Auckland boat show. The claims are that significant energy savings are achievable by the smart controller's processor continuously scanning key environmental factors such as internal temp and system supply voltage. The impact of this results in a recalibration of the compressor speed which maximises performance and loads consumption. Installation was fairly straightforward on my 375 and I haven't yet been able to our a substantive data other than my observations over the last week. Two noticeable differences are; the fridge temperature is now cooler, and the compressor operates with less noise. It is easy to install but required some minor carpentry to access the back of the compressor control unit. The tricky part is the installation of the sensor probe near the bottom of the fridge without having to channel wiring inside the fridge wall. I have managed to do this by drilling from within the lower cabinet in the galley and being able to exit The whole inside the fridge at the lower point for the installation of the probe. The existing control I have not has been left intact are the only impact to this has been the wiring at the back of the control unit on the attached to the compressor. I have installed a new potentiometer where the existing light is fitted. Webasto have a double adapter unit which fits into that slot and allows for the light fitting and the potentiometer meter to be fitted into this housing. The new processing unit plugs into the back of the existing control unit behind the compressor. Condensation on the side wall which faces the sqaub is in evidence on my vessel as well. Speaking to a refrigeration technician and looking at the remediation work done on a another Hanse 375, they installed foil insulation material on the outer wall with the expectation that this will reduce the moisture penetration onto the squab. Regarding another issue raised in this discussion topic about condensation under the refrigeration unit: solution would be to install a fan in the chamber where the compressor is to draw the fear to allow for circulation this should reduce the incidence of condensation. This could be linked to the compressor so that the firm only operates whilst the compressor is active. ------------- piquet Brisbane, Australia |
Posted By: piquet
Date Posted: 31 October 2013 at 04:51
|
Just a heads up on managing energy and compressor rub time more efficiently. I have installed a Smart Energy Control onto my Webasto fridge. I came across this at the Auckland boat show. The claims are that significant energy savings are achievable by the smart controller's processor continuously scanning key environmental factors such as internal temp and system supply voltage. The impact of this results in a recalibration of the compressor speed which maximises performance and loads consumption. Installation was fairly straightforward on my 375 and I haven't yet been able to our a substantive data other than my observations over the last week. Two noticeable differences are; the fridge temperature is now cooler, and the compressor operates with less noise. It is easy to install but required some minor carpentry to access the back of the compressor control unit. The tricky part is the installation of the sensor probe near the bottom of the fridge without having to channel wiring inside the fridge wall. I have managed to do this by drilling from within the lower cabinet in the galley and being able to exit The whole inside the fridge at the lower point for the installation of the probe. The existing control I have not has been left intact are the only impact to this has been the wiring at the back of the control unit on the attached to the compressor. I have installed a new potentiometer where the existing light is fitted. Webasto have a double adapter unit which fits into that slot and allows for the light fitting and the potentiometer meter to be fitted into this housing. The new processing unit plugs into the back of the existing control unit behind the compressor. Condensation on the side wall which faces the sqaub is in evidence on my vessel as well. Speaking to a refrigeration technician and looking at the remediation work done on a another Hanse 375, they installed foil insulation material on the outer wall with the expectation that this will reduce the moisture penetration onto the squab. Regarding another issue raised in this discussion topic about condensation under the refrigeration unit: solution would be to install a fan in the chamber where the compressor is to draw the air to allow for circulation this should reduce the incidence of condensation. This could be linked to the compressor so that the firm only operates whilst the compressor is active. ------------- piquet Brisbane, Australia |
Posted By: MartinWatts
Date Posted: 31 October 2013 at 14:18
|
Improving the air flow to the compressor is very easy and cheap to do. See the 341/21 Forum http://www.myhanse.com/forum_posts.asp?TID=7850&title=fridge-comprressor-cooling" rel="nofollow - http://www.myhanse.com/forum_posts.asp?TID=7850&title=fridge-comprressor-cooling ------------- Martin sailing Dipper Hanse 341 |
Posted By: Gran Onada
Date Posted: 22 December 2013 at 17:17
|
I want to improve the fridge insulation on my 350, has any tried such job on the 350? Is there any insulation from factory or the fridge is just the fiberglass box? Cheers ------------- Gran Onada IV - Hanse 350 #130 |
Posted By: Idelfix
Date Posted: 22 December 2013 at 20:13
|
Hi I think your fridge is the new model and then s it made of PVC plastic Check the inside seam and piping penetrates the rear edge. It is also good to make holes in the cabinet to the compressor and the rear edge into the fireplace   ------------- "Keep sailing in free wind" http://suhrfa.blogspot.se |
Posted By: Johan Hackman
Date Posted: 11 May 2018 at 16:17
|
I am digging up this old thread because I think the time has come for me to get my act together and follow all the good advice in this thread (and and a few other threads on the same subject) and insulate my cool box with polyurethane foam. The first step I have taken is to practice to use the foam. I used an wine box to see how much the foam would expand and to see if the expansion would make the box explode. Expand it did. I filled the box with foam and for the next twenty minutes or so lots of foam escaped through the hole. Johan  ------------- http://www.johanhackman.se" rel="nofollow - http://www.johanhackman.se |
Posted By: Johan Hackman
Date Posted: 11 May 2018 at 16:21
|
The next step was to cut the box with a knife. I was surprised to see how easily the cured foam was cut and formed. It seems any excess foam will be easily removed when applied around the cooling box. It was also interesting to see the density of the foam. It will probably work perfectly as insulating material. Johan  ------------- http://www.johanhackman.se" rel="nofollow - http://www.johanhackman.se |
Posted By: samuel
Date Posted: 11 May 2018 at 17:12
|
Johan If you look closely you may find that the foam in the centre has not cured properly. ( the box on the left shows some shading in the central area, other pieces are whiter)This is sometimes due to insufficient moisture to cure it & too much initially placed the area to be filled. If your wine box had some wine in it it may have helped the moisture content. If your new surround does not have moisture you may end up with a gooey mess. As an example i was making a dan buoy & filled a plastic bottle. The foam just went to a sticky mess & did not expand. If I had poured in some water first it would have worked. Of course a lot depends on the foam. Some may not need moisture. so I may be out of order & you may already be aware- If so apologies Samuel
------------- Daydream Believer- Hanse 311- No GBR9917T- Bradwell Essex |
Posted By: Weak Moment
Date Posted: 11 May 2018 at 18:47
|
Thanks for bringing this up - I need to do the same for my 371. Perhaps more needed here in South Florida than in the archipeligo. To give you an example of why the insulation is needed, with an ambient air temperature of +25, half way up the inside of the box the temperature is +13, while the bottom of the box is at -3. |
Posted By: Johan Hackman
Date Posted: 11 May 2018 at 21:01
|
Samuel, I value your input. I filled the box to the top, and as you can see, the expanded foam ended up outside of the box. The result would probably be much better if just the amount of foam was sprayed that would fit the desired space in its expanded form. Then it would probably cure much better. The instructions for my foam says that a bit of sprayed water would be good but I think the intention is to get better adherence to the the surrounding surfaces. There is also a paper bag (grill briquettes) in my picture that I just partly filled with foam and the result came out nice, but then again, if I would have wanted to fill the whole bag I used to little foam. I guess you know what I mean by "practice". Before I go into spraying around my fridge box I will try it a few more times in my garden, like above. Johan ------------- http://www.johanhackman.se" rel="nofollow - http://www.johanhackman.se |
Posted By: Johan Hackman
Date Posted: 11 May 2018 at 21:05
The same with my box, the temperature varies a lot with the height. However, my main concern is electric consumption. I think the fridge is the number one power thief on my boat. Johan ------------- http://www.johanhackman.se" rel="nofollow - http://www.johanhackman.se |
Posted By: skipper
Date Posted: 11 May 2018 at 22:14
|
Hi guys, you can do it the right way or the quick and dirty, it is your call. I used 2 component PU foam to prevent the foam to capture humudity over the years and also to be sure that the foam is cured "instantly" (no expansion afterwards). The technique/method I used was "stolen" from a company in Gothenburg. //Stefan
------------- Cheers, Skipper Former owner of Hanse 342 2005 (Sparcraft mast, white hull, wheel steering, deep draft keel, short rudder) |
Posted By: Johan Hackman
Date Posted: 22 May 2018 at 08:53
I might be quick and dirty. Or perhaps not quick as I have been wanting to insulate my fridge for years but haven't yet got around to do it, mainly because I have found the procedure to be scaringly difficult. I am planning to put one or two layers of extruded polystyrene at the bottom of the box (i.e. 50 or 100 mm) in order to insulate downwards and at the same time avoiding to put foam under the box where for instance the heater tube is located. I will cover it with an aluminium plate. Johan ------------- http://www.johanhackman.se" rel="nofollow - http://www.johanhackman.se |
Posted By: Johan Hackman
Date Posted: 22 May 2018 at 08:59
I have gone on experimenting with the foam and have discovered that sometimes the foam does not cure as well as it did the first time (when Samuel pointed out that not even then was it fully cured). I also found big air compartments when cutting the foam. Trying to spray some water before spraying the foam seems to solve this so I am grateful for the advice. I will practice some more before I cut holes from inside my cooling box and spray foam to insulate it. The big problem with spraying the actual box is that you cannot see what you are doing nor can you inspect the result. Johan ------------- http://www.johanhackman.se" rel="nofollow - http://www.johanhackman.se |
Posted By: Johan Hackman
Date Posted: 02 June 2018 at 15:15
|
The experimentation in its final stages in this picture. I found out that spraying water is essential to get a well cured foam so I got a small spray bottle. I thank you again for that piece of advice, Samuel! Someone also to told me to be careful not to let the forces of the expanding foam indent the walls of the fridge and I therefore filled a gloss bottle with foam but concluded that the forces won't be that strong. Johan  ------------- http://www.johanhackman.se" rel="nofollow - http://www.johanhackman.se |
Posted By: Johan Hackman
Date Posted: 02 June 2018 at 15:24
|
And now the works on the fridge has commenced! I begin with filling the space between the back of the box and the hull with foam. As there is a gap between the plywood the box stands on and the hull I began with drilling two holes at the bottom of the box. I then put a plastic shopping bag on the inside and filled it with foam. This way I could bar the gap without filling the space under the fridge with foam. I will put a sheet of extruded polystyrene at the bottom of the fridge which will both cover the two holes and insulate the fridge downwards. You can also see a hole that I have drilled behind the cooling plate. After the bar below had cured I sprayed foam into that hole. Johan  ------------- http://www.johanhackman.se" rel="nofollow - http://www.johanhackman.se |
Posted By: Johan Hackman
Date Posted: 02 June 2018 at 15:26
|
I was interested to see that the walls of the box are approximately 22 mm thick. Johan  ------------- http://www.johanhackman.se" rel="nofollow - http://www.johanhackman.se |
Posted By: Johan Hackman
Date Posted: 05 June 2018 at 19:14
I hope the topic starter does not mind that I post a few more pictures of the progress of insulating my fridge. I just want to contribute to the this excellent thread the way I can.  Here is a picture of one hole used to fill the space behind with foam next to a hole yet to be used. The excess foam from the first hole has been cut off with a knife. Both holes will be covered with an aluminium plate according to my plan. Johan  ------------- http://www.johanhackman.se" rel="nofollow - http://www.johanhackman.se |
Posted By: Gregor
Date Posted: 05 June 2018 at 19:17
|
Nice job Mr. Hackman. How do you know if your foam has covered the whole box? ------------- Uisge Beatha Currently sailing Dehler 36 JV (2002) Previous boat: Hanse 311 #80 http://www.uisge-beatha.eu" rel="nofollow - http://www.uisge-beatha.eu |
Posted By: Johan Hackman
Date Posted: 05 June 2018 at 19:19
I don't know if all Hanse 342s look the same but this is how it looks on mine. (The outside of the cooling box looks wet because I sprayed it with water to prepare for foam to be sprayed.) The way I made sure I could spray foam into a confined space was to put pieces of extruded polystyren in the opening. It looks like this:  Johan ------------- http://www.johanhackman.se" rel="nofollow - http://www.johanhackman.se |
Posted By: Johan Hackman
Date Posted: 05 June 2018 at 19:21
I don't. That's why I practised with the foam in my garden so I would get a good idea of how it will react when I do it in the real situation. Johan ------------- http://www.johanhackman.se" rel="nofollow - http://www.johanhackman.se |
Posted By: Johan Hackman
Date Posted: 10 June 2018 at 19:45
|
The task to insulate the fridge is now in its final stages. I have sprayed foam around the box on all sides. There has however not been possible to spray under the box, which is the most important place as cold wanders downwards. I have solved this by cutting a 50 mm thick piece of extruded polystyrene to put at the bottom of the box, from the inside. I was considering putting two layers but thought 100 mm less from the bottom of the box would make the box too small. Johan  ------------- http://www.johanhackman.se" rel="nofollow - http://www.johanhackman.se |
Posted By: Johan Hackman
Date Posted: 10 June 2018 at 19:49
|
I have finished the job by putting a piece of aluminium at the bottom of the box and on the sides to cover the holes that I made to spray foam. Now I only have to do some polishing and put the lid back. I will also try to find a new spring for the lid as the old one seems have lost some of its former tension. Johan  ------------- http://www.johanhackman.se" rel="nofollow - http://www.johanhackman.se |
Posted By: Gregor
Date Posted: 28 June 2018 at 19:46
|
Johan, Does your boat have the pretty thin cover plate? Ive written a few blog posts when I rebuild my fridge. In Dutch.... https://www.uisge-beatha.eu/logboek/398/Verbouwing-koelbox-1" rel="nofollow - https://www.uisge-beatha.eu/logboek/398/Verbouwing-koelbox-1 ------------- Uisge Beatha Currently sailing Dehler 36 JV (2002) Previous boat: Hanse 311 #80 http://www.uisge-beatha.eu" rel="nofollow - http://www.uisge-beatha.eu |
Posted By: Johan Hackman
Date Posted: 28 June 2018 at 22:09
|
Gregor, I have looked at that particular part of your site many times to get ideas how to insulate my own box. However, my boat is different and not as accessible as yours. I wanted to open up much more to get access but it was not possible so I choose to spray the foam from holes that I had drilled from inside the box. And yes, the cover is very thin but as cold air is heavy I don't think that the leakage is through the top. If you put your hand on it it is cold though, so maybe there is a leakage after all. What were you thinking? Johan ------------- http://www.johanhackman.se" rel="nofollow - http://www.johanhackman.se |
Posted By: Gregor
Date Posted: 29 June 2018 at 06:02
|
Johan, We had to remove the kitchen blade to make it accessible  The cover of my Dehler wasn't well insulated too, so I split the cover in a horizontal way, put tape around the closing part, measured the space between the lower and upper part, put holders in place and sikaflex between the two layers, som wheight on top of it. By the time it was dry, I knew the cover would close as much as possible. The cover in certain Hanse-series is very poorly designed. However it would be more or less a waist of your work if the cover remains a problem. Having said this, just take note of the time your home fridge is running when cooling.... ------------- Uisge Beatha Currently sailing Dehler 36 JV (2002) Previous boat: Hanse 311 #80 http://www.uisge-beatha.eu" rel="nofollow - http://www.uisge-beatha.eu |
Posted By: Martin&Rene
Date Posted: 08 July 2018 at 21:58
|
I never had the nerve to do the full job as Skipper detailed, but did insulate the box with pieces of closed cell foam. I had also improved the performance of the compressor by installing a fan. http://www.myhanse.com/fridge-comprressor-cooling_topic7850_post61459.html?KW=compressor#61459 So my final thought was to reduce the heat loss through the fridge lid, in particular through the metal surrounds of the hatch and its cover. I made a cover from cork tiles. The top layer is from 4 cork tiles. The bottom layer is 4 cork tiles, cut into 1 full one, 4 half tiles and 4 quarter tiles and the 2 layers stuck together with staggered joints. 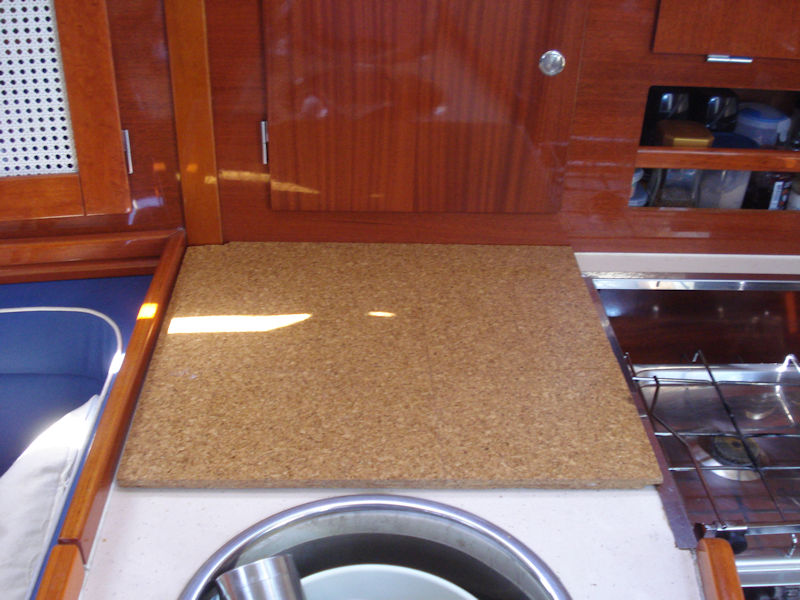 Having cut the cover to the right shape, the second photo shows the underside. I have glued on a small raised section that just fits outside the shape of the fridge metal edging, so that the cover does not rest directly onto the fridge lid. 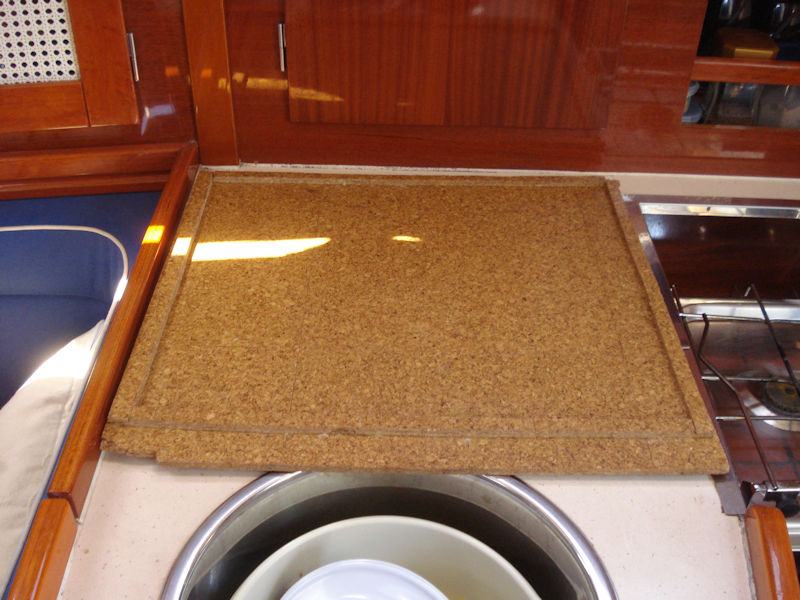 Do not ask me how good it is, but when the sun is shining through the hatch cover onto the fridge (as it has a lot in Scotland this year), it must be doing something. It is also useful, if you put down a hot pan. ------------- Martin&Rene Hanse 341 Dipper Wheel steering, 3 cabin layout, normally based in Scotland |