


|
| |
| Welcome to myHanse.com the forum for Hanse Yachts owners throughout the world. | |
Thrust bearing, coupler and PSS seal |
Post Reply 
|
Page <12 |
| Author | |
Wild 
Vice Admiral 

Joined: 18 March 2010 Location: Turkey-Greece Status: Offline Points: 937 |
 Post Options Post Options
") Thanks(0) Thanks(0)
 Quote Reply Quote Reply
 Posted: 12 July 2023 at 09:30 Posted: 12 July 2023 at 09:30 |
|
Hello? I dont know your name Sorry
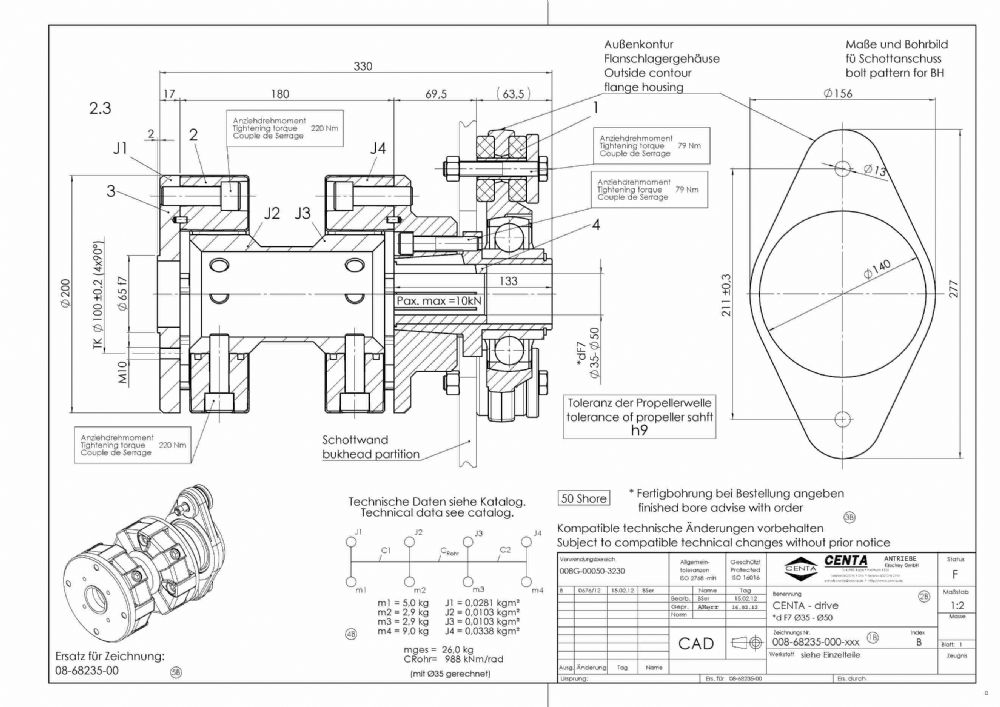
You cant find it in any documents  (users manuals: Hanse, Yanmar) so far I know,you can try it in Australia by the local dealer Windcraft yachts They are one of the only Hanse dealers for many years. (users manuals: Hanse, Yanmar) so far I know,you can try it in Australia by the local dealer Windcraft yachts They are one of the only Hanse dealers for many years.I took a lot of measurements of the coupling and the TB 3 and the only whos come out is CF-AGM 50-3 + TB 3.
|
|
|
Wild and Wet
Belgium 545e#268 |
|
 |
|
|
ccuthbe
Lieutenant 
Joined: 26 November 2022 Location: Australia Status: Offline Points: 27 |
Post Options
Thanks(0)
Quote Reply
Posted: 25 March 2024 at 04:15 |
|
I completed this job late last year.
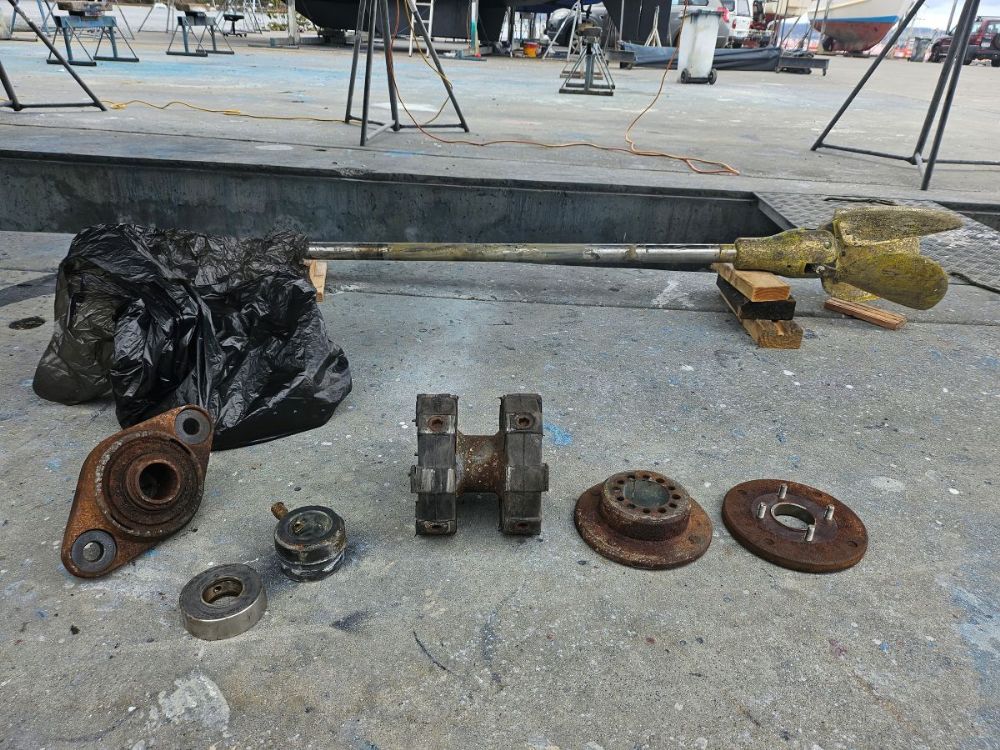
I ended up buying the entire coupling (CF-AGM-050-3-2.3) from local distributor in Australia. Cost was approx US$3200 delivered. This was the right decision, there was no way in the world the old coupler was coming out intact.
 Edited by ccuthbe - 25 March 2024 at 04:49 |
|
|
|
|
ccuthbe
Lieutenant
Joined: 26 November 2022 Location: Australia Status: Offline Points: 27 |
Post Options
Thanks(0)
Quote Reply
Posted: 25 March 2024 at 04:34 |
|
The interior of the cupboard in the port aft cabin needed to be removed, including the second 'skin' fitted against the inside of the cupboard aft of the engine compartment. The floor section under the cupboard was also removed to improve access and in my case, a small section of bulkhead was also necessary to be removed for access.
As my coupling was heavily corroded, it was necessary to cut it out. I used an angle grinder with a cutting wheel to cut the bolts holding the rubber donut and removed it first, then proceeded to cut other bolts removing all components piece by piece. Not withstanding the corrosion on my unit, it would have been VERY difficult to remove this using non destructive measures. Heat can't really be used and bolts have strong thread locker along with high torque and access is poor even after my disassembly. Not sure how you would ever change PSS seal, presumably people have managed it? Once the coupler was removed, the shaft slid out easily and was just the right length to drop out before being fouled by the rudder. All in all, I probably spent a day disassembling the cupboard and cutting out the coupler.  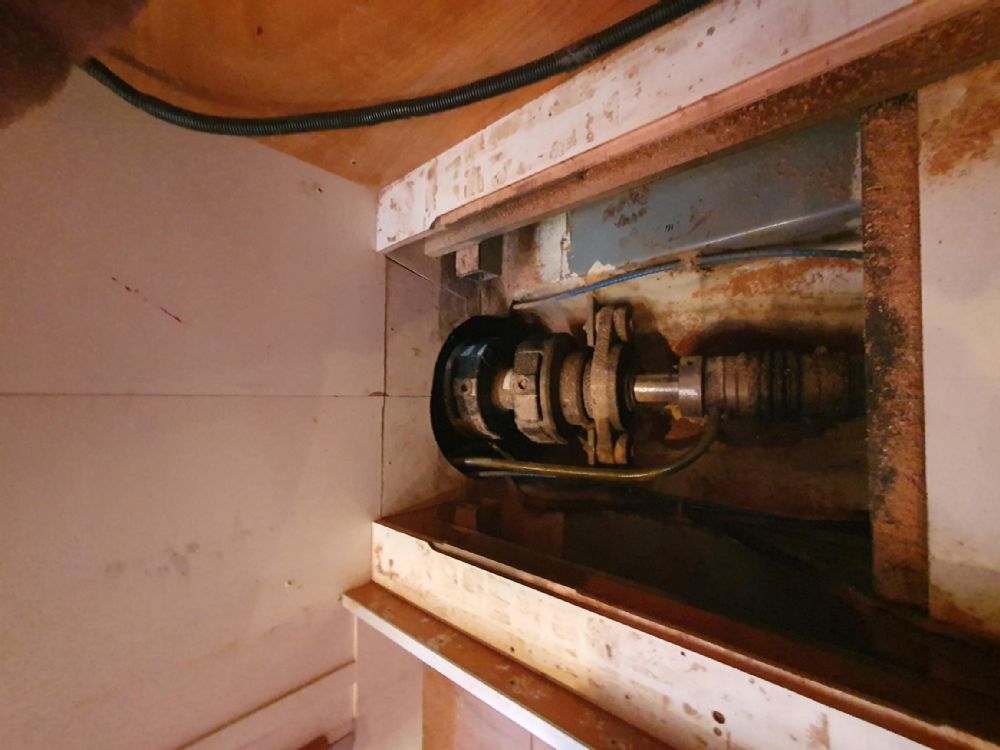 Edited by ccuthbe - 25 March 2024 at 04:52 |
|
|
|
|
ccuthbe
Lieutenant
Joined: 26 November 2022 Location: Australia Status: Offline Points: 27 |
Post Options
Thanks(0)
Quote Reply
Posted: 25 March 2024 at 04:43 |
|
|
|
|
|
ccuthbe
Lieutenant
Joined: 26 November 2022 Location: Australia Status: Offline Points: 27 |
Post Options
Thanks(0)
Quote Reply
Posted: 25 March 2024 at 04:48 |
|
Installation of the new coupler was relatively straight forward and was completed within half a day. Instructions are good and it all goes together in a logical fashion, largely the reverse of the process to remove the old. Initially I was concerned the bearing was on the wrong angle, but it turned out its a moveable, self aligning bearing and just need some gentle persuasion. I also replaced the entire PSS seal unit given it was well past due and this is a major undertaking and necessary to remove shaft.
  Edited by ccuthbe - 25 March 2024 at 04:57 |
|
|
|
|
ccuthbe
Lieutenant
Joined: 26 November 2022 Location: Australia Status: Offline Points: 27 |
Post Options
Thanks(0)
Quote Reply
Posted: 25 March 2024 at 05:00 |
|
The result - shaft is silky smooth, no vibration and less noise. Whilst quite a bit of work, well worth the investment for peace of mind and smoothness. Absolutely doable for a reasonably handy DIYer. If you can get the old out, reassembly is a breeze.
|
|
|
|
|
Wild
Vice Admiral
Joined: 18 March 2010 Location: Turkey-Greece Status: Offline Points: 937 |
Post Options
Thanks(0)
Quote Reply
Posted: 16 September 2025 at 09:56 |
|
Hé
Unfortunate we broke one of the rubber absorbers of our Centaflex kinetick AGM 50 coupling a month our 2 ago. After 15 years +2500hours We dicided to refit the whole shaft coupling Just reused the metal parts like flanges ,the shaft to Centaflex connection and the propshaft after rectifying the straitness by a specialized company. new Centaflex absortion rubbers(2x), the shaft end bearing Centaflex, front and back stuffing boxes, new PSS bellow and the 4 Yanmar engine silent supports.To get the engine in line with the propshaft we have to place extra inox washer plates( 8mm) under the front supports to get it right.Conclusion :the engine-shaft where never correct in line from the factory (probably the cause of the broken rubber) We fix the whole job without destroying anything of the furniture removing the engine our the generator who is on the top. The engine now run very smootly and quieter as before. But it was not easy at all because the very difficult acces.
|
|
|
Wild and Wet
Belgium 545e#268 |
|
|
|
|
Post Reply
|
Page <12 |
| Tweet |
| Forum Jump | Forum Permissions You cannot post new topics in this forum You cannot reply to topics in this forum You cannot delete your posts in this forum You cannot edit your posts in this forum You cannot create polls in this forum You cannot vote in polls in this forum |
|
Links : www.hanseyachts.co.uk www.hanseyachts.com www.fjordboats.co.uk www.dehler.co.uk www.varianta.co.uk |


 Topic Options